Tag Archives: SSH

Cisco ASR “private key not found” Error

I was working on a ASR running code: asr1000rp1-ipbasek9.02.02.01.122-33.XNB1.bin. I wiped the config and started over from the last setup, and tried to SSH in. I was continually getting denied, and check the router – This error showed up.

1w2d: SSH2 0: RSA_sign: private key not found
1w2d: SSH2 0: signature creation failed, status -1

My first thought was to recreate the cert – so I did, still a no go.

I then recreated the cert with a different label or name, and then told the ASR to use this key pair instead – and everything worked. Its like I could not find the default key pair. The commands that I did to fix this are:

crypto key gen rsa general-keys label KEYPAIR-1 modulus 2048

ip ssh rsa keypair-name KEYPAIR-1

Then the ASR gave this back:

Jan 13 07:08:51: %IOSXE-7-PLATFORM: SIP0: sntp: resetting on error 0.273 > 0.1
Jan 13 07:08:52: %SSH-5-DISABLED: SSH 2.0 has been disabled
Jan 13 07:08:52: %SSH-5-ENABLED: SSH 2.0 has been enabled

Enabling SSH on Dell Powerconnect 5000/6000/7000

No one is probably trying to even do this anymore due to the new Dell switching lines, but thought I would see if I could help. I had this issue the other day, and it took a good bit of googlefu before I could find my answer .

The problem I had was getting SSH enabled on a Dell PowerConnect 7048P. I created my user/passwords , and then generated my certificate, and then enabled the SSH server.. I got this error

PC-7048(config)#crypto key generate rsa

RSA key generation started, this may take a few minutes……..
RSA key generation complete.

PC-7048(config)#

PC-7048(config)#ip ssh server

SSH could not be enabled.

Hmmm… Why is that, all of my needed components are there, so why is it not working. The reason is there is no Cert to be used by SSH. These models use the Digital signature Algorithm (DSA) Certificate instead of the RSA cert. SO we need to create the DSA Cert.

PC-7048(config)#crypto key generate dsa

DSA key generation started, this may take a few minutes………………….
DSA key generation complete.

PC-7048(config)#ip ssh ser

No error!! and it works just fine.

Good reading for the comparison of RSA vs DSA: http://security.stackexchange.com/questions/5096/rsa-vs-dsa-for-ssh-authentication-keys

Configuring an IP address and enabling services such as SSH/HTTPS on Brocade Vyatta CLI

When Brocade purchased Vyatta I was nervous, but they have done a really good job with it. They keep it updated, and now have added a lot of functionality and increased services with the 6400 version. Both the 5600 (pretty much old vyatta) and the newer 6400 Vyatta IOS are for free from Brocade fro 60 days.

This blog entry is just showing some very simple things such as adding a IP address to an interface and enabling the HTTPS and SSH service. In another entry i will show how to use other user authentication methods for user logins. Although all of these commands are very easy, this post could help someone who might be in a bind.

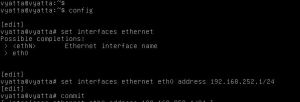
Configure an IP address.

The Vrouter CLI has always been intuitive for me. Each config option is really an objects configuration. You can delete the config altogether or just an individual config setting of the object. To set the IP address first you have to go into configure mode.

configure

set int ethernet eth0 address 192.168.252.1/24

commitremember nothing is set, until this is entered.

The image below shows these commands in the actual CLI.

ip-1

We can also save the config in config mode by issuing the command “save”.

That’s, it we have now set an IP address.So on to enabling SSH and HTTPS access.

HTTPS

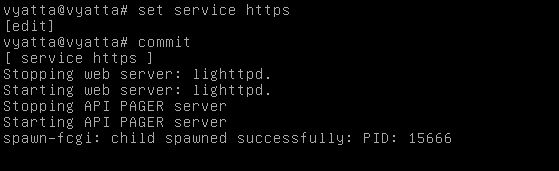
To enable HTTPS we need to issue the command (from config mode)

set service https

commit

As you can see from the image below, after those commands are entered the Vyatta generates a certificate, and restarts its web server.

https2

SSH

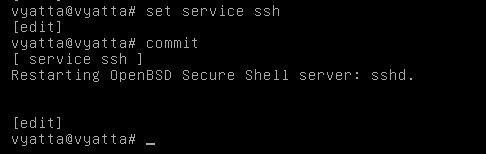
Enabling SSH is as easy as the other commands.

From config mode

set service ssh enable

commit

You also have options to allow root login, set the listen address, and change the port.

SSH