recently I had an issue where the firmware on a 9200 switch was corrupted. This can help during an upgrade, or removal, etc.
After a reboot the switch came up to rom monitor mode, no biggie I thought- just copy the firmware from USB over to flash and install. This did not work, I continued to get error: “Unsupported destination device/filesystem.” see below-
This fully loaded up the switch, and came up at a default setup screen. Once there I copied over the file VIA TFTP to flash. The device would not recognize the USB drive now (Probably cause I booted from it). Once copied to flash, I just installed normally, and rebooted.
Switch# install add file flash:/cat9k_lite_iosxe.17.03.04b.SPA.bin activate commit install_add_activate_commit: START Thu Feb 10 16:59:35 UTC 2022 Feb 10 16:59:36.334: %INSTALL-5-INSTALL_START_INFO: R0/0: install_engine: Started install one-shot flash:/cat9k_lite_iosxe.17.03.04b.SPA.bin Feb 10 16:59:36.334 %INSTALL-5-INSTALL_START_INFO: R0/0: install_engine: Started install one-shot flash:/cat9k_lite_iosxe.17.03.04b.SPA.bin
*Feb 10 16:59:36.297: %INSTALL-5-INSTALL_START_INFO: Switch 1 R0/0: install_engine: Started install one-shot flash:/cat9k_lite_iosxe.17.03.04b.SPA.bininstall_add_activate_commit: Adding PACKAGE install_add_activate_commit: Checking whether new add is allowed ….
This operation requires a reload of the system. Do you want to proceed? Please confirm you have changed boot config to flash:packages.conf [y/n]y
IMPORTANT!!!
Next you have to change the boot config – or else it will go back to rom monitor.
I was working on a ASR running code: asr1000rp1-ipbasek9.02.02.01.122-33.XNB1.bin. I wiped the config and started over from the last setup, and tried to SSH in. I was continually getting denied, and check the router – This error showed up.
1w2d: SSH2 0: RSA_sign: private key not found 1w2d: SSH2 0: signature creation failed, status -1
My first thought was to recreate the cert – so I did, still a no go.
I then recreated the cert with a different label or name, and then told the ASR to use this key pair instead – and everything worked. Its like I could not find the default key pair. The commands that I did to fix this are:
crypto key gen rsa general-keys label KEYPAIR-1 modulus 2048
ip ssh rsa keypair-name KEYPAIR-1
Then the ASR gave this back:
Jan 13 07:08:51: %IOSXE-7-PLATFORM: SIP0: sntp: resetting on error 0.273 > 0.1 Jan 13 07:08:52: %SSH-5-DISABLED: SSH 2.0 has been disabled Jan 13 07:08:52: %SSH-5-ENABLED: SSH 2.0 has been enabled
So, you went into to the interface and are looking for VRRP, but cant find it. I had done this 1000 times in other firmwares/devices and had no issues setting up VRRP. But for some reason on I could not find VRRP under the interface – Thought it was firmware/licensing (IP Services) – Nope all good there. The trick was that you have to enable the First Hop Routing Protocol you want to run.
Do this with
config t
fhrp version vrrp v3 or v2
Now VRRP will show up under the interface and you can configure it as normal.
Some search help – Where is VRRP , 3850 VRRP not there
I installed a new license to a ASR 1002-X going from the default 5 gig to 20 gig throughput. Installing the license was no problem, but after the reboot nothing changed. I found that I had forgotten to change the hardware throughput settings – I thought the license would jus take care of this, but it didn’t.
Here are the commands/options to get the hardware throughput to match the license
First – lets check to make sure what the level is –
ASR#show platform hardware throughput level The current throughput level is 5000000 kb/s
You can also do a show version and see this info.
Now, lets change to our installed license throughput level.
ASR(config)#platform hardware throughput level ? 10000000 throughput in kbps 20000000 throughput in kbps 36000000 throughput in kbps 40000000 throughput in kbps 5000000 throughput in kbps
The Cisco C92160YC has the option to change the port layout for different bandwidth needs. Below hows the command to change the default (In my case) port config from 48x25G ports, with 2 X 100G, and 4 X40 to 4 100 Gig ports. This way
c92160yc-x-01# show run | inc port hardware profile portmode 48x25G+2x100G+4x40G
The above looks through the config for the setting – I do believe you can also “show hardware profile”.
Below shows the config to change the setting, and different options under the setting.
c92160yc-x-01# config t Enter configuration commands, one per line. End with CNTL/Z. c92160yc-x-01(config)# hardware profile portmode ? 48x25g+2x100g+4x40g 48x25G+2x100G+4x40G port mode 48x25g+4x100g 48x25G+4x100G port mode
I work with a lot of sites that are multi-homed or have a backup connection that, even though its backup still needs to be used at the same time for load balancing. Recently I was able to have a site that had a very slow MPLS link that was being moved to only backup – and a new SD-WAN link has been installed as primary. The MPLS link will go away after were sure the SD-WAN option works well.
The only time we want this link to become active is if SD-WAN fails. My first thought is no problem, just use a routing protocol and a static route – the routing protocol will be our preferred method, and we can just raise the admin distance of the default route to make it a backup. One problem in this scenario, the MPLS uses dynamic routing (EIGRP), and many other locations still use the MPLS for primary, or secondary connections, so we cannot even have this link up (admin state) or the MPLS will advertise the network.
So, to recap what I need is a preferred route to our SD-WAN, and if SD-WAN fails, bring up the backup connection admin state and move traffic to it. Then of course, auto fix everything if SD-WAN comes back online. No problem! Cisco’s Event Manager to the rescue. Cisco’s Embedded Event Manager (EEM) (Copied From Cisco) –is a distributed and customized approach to event detection and recovery offered directly in a Cisco IOS device. EEM offers the ability to monitor events and take informational, corrective, or any desired EEM action when the monitored events occur or when a threshold is reached. An EEM policy is an entity that defines an event and the actions to be taken when that event occurs. When creating EEM scripts, you have two options TCL or CLI – in this case I am using just CLI.
Using EEM on the 3850 core I was able to detect if the default route learned VIA OSPF was removed from the routing table – if that happened, then run the command “No shut” on my MPLS uplink and EIGRP would take over. If the default route was learned at some point through OSPF when things were corrected – then run the command “Shut” on my MPLS uplink. This worked extremely well in combination with Link detection on the Fortigate, and OSPF default route distribution.
The Fortigate is my SD-WAN device, and my default gateway for the network. I am using link detection to test HTTP access to google. If my WAN interface cannot get a response from google.com in my set time (5 attempts, with 5 seconds between each attempt) then it will remove the default route from my routing table. When this happens the route will be removed from redistribution in OSPF, and removed from the Cisco core. EEM sees this event, and does my list of commands. Below shows the layout, and code to get this going. Interface 0/24 is my MPLS uplink.
First I made sure that the MPLS interface was shutdown and OSPF was up, and I was receiving the redistributed default route from the Fortigate.
You can check status and history of events by using the show event manager commands.
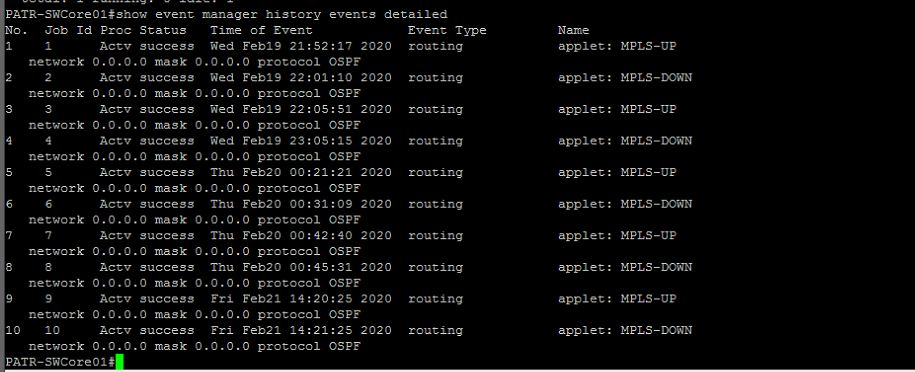
During a failure of my ISP, everything worked great. The default route was removed from OSPF, which caused an event that EEM matched – then it enabled the MPLS interface, and all routes/default was learned VIA EIGRP and the MPLS. When internet was restored, the MPLS interface was shutdown, and all traffic started flowing over SD-WAN.
Cisco Flex links give the ability to have a layer2 redundant connection, or pair of connections configured as an Etherchannel for a primary link. This is an active/passive setup where if the primary connection’s link status goes down, the Flex link will become active, and if the primary comes back it will go into a standby mode and not take back primary functionality unless told to do so with preemption commands. STP is disabled automatically on Flex Links so no need to bother with Portfast.
Flex links started in code a long while back, and not sure how I missed them. I have needed this functionality before if I was connecting to a backup Firewall, or some device that Spanning-tree would have issues with. This options gives a great way to have a backup link configured if you just need it to become active if something happens to the primary link. In the below scenario I have a Fortigate firewall and Cisco 3560 switch. Port FA 0/1 is my primary and goes to Port 1 of the FGT, and Port 12 is the backup port for this link.
Notice that the primary state is active and up. Now, I will cause a physical port state change by unplugging the interface and see how many pings/time it takes to failover.
After unplugging the primary connection, the link light of port 12 instantly came on and went green, I didn’t even lose a ping to my switch. All mac/uplinks moved over the backup port but no loss. Below shows the status after. Notice that the backup state is up, not the primary. The primary port after plugging it back up is amber like a blocked port, and both interfaces port status show up, even though the primary port at this point is not forwarding traffic.
This is a design I need a few weeks ago to help with a redundancy issue. Currently we have a client that occupies two buildings separated by about 500 hundred feet. Soon they will start construction to add a structure right in the middle , connecting the two buildings. But guess what runs right in the middle of this area? The fiber connecting the two buildings. We are thinking that the construction will most certainly cut the fiber causing an outage, whether planned or not.
We decided to have a backup wireless bridge link to help with redundancy. Ruckus’s P300 AC bridges works great, and that is what we decided to do .
Currently the link between the buildings is a Layer2 Trunk, and we are routing over Vlan 254 which traverses the trunk. OSPF is used to advertise each building’s local subnets, and redistribute the default route.
The goal is that routing/layer 2 will only come active on the wireless bridge in case of a failure in the Fiber connections. So Spanning-tree will block all vlans other than the native 200 – going through the bridge. If there is a failure, those vlans will come online over the bridge, routing will come up, and all should work great.
The switching/routing that is used is a Nexus 9500 and 3850 stack.
To accomplish the above, we enable OSPF on vlan 254, and make sure all routing is correct – including redistribution. Vlan 254 our routing vlan is allowed along with a few other vlans – At some point this will be fixed and we will only route over this link, but for now we have to stretch (I know, not the best practice). Building 1 is currently the STP root for all vlans stretching over layer 2 link. The Spanning-tree path cost is increased on links connecting to the bridge, and special commands are enabled on the wireless bridge to disable the Ruckus loop detection mechanism. This is very important because it will stop STP from flowing by default. Follow this link to help with that:
After the bridge was setup, path cost modified, and Cisco port configs set correctly – it is time to test. First we needed to make sure STP was indeed blocking the vlans that were needed. Yes! STP is blocking the redundant path.
Testing/Results
We tested fail over in two ways. 1 – just shutting down fiber links in CLI, and 2- physically unplugging the links. During fail over we saw that 2 pings were lost and then they were back up. I actually thought that OSPF drop, and then re-converge, but that did not happen. Instead, since the Hello-Dead timers were never reached, OSPF never dropped – fail over time was much better than I expected. The only way I could really tell we had failed over was a small increase in latency, and of course we were limited to around 300 Mbits.
Some notes on this – Make 100% sure that the Ruckus loop detection is disabled before even starting actual bridge configuration. Also create some kind of alerts VIA Prtg/Solarwinds/Cacti to send an alert if links go down, or their is a big increase in bandwidth on wireless bridges.
I wanted to create a backup link for a network using a P300 bridge. The current network has two 10 gig links going between two buildings, but construction is set to start soon, that could cut the fiber stretching between. One option was to use the P300 bridges to create a backup link between the two building, which would become active in case of a failure in the fiber links.
We are currently stretching maybe 12 vlans between the buildings. The goal was to have all data go over the 2×10 gig links, and Spanning-tree block the other vlans from using the Bridge. I increased the STP port cost on each side and brought up the bridges – and both fiber links and bridge were forwarding, causing a loop. It took a bit to understand, but according to Ruckus their Gateway bridge detection mechanism basically stops STP and LACP from forwarding. I found the below help doc from Ruckus which gave the command to disable this feature.
I recently had an issue with a Office 365 deployment. This was a hybrid deployment, and as we were trying to start syncing to Office 365 we were getting an error in our logs :
(Retry : Must issue a STARTTLS command first)
This was causing mail not to flow. This site happened to be behind a Cisco ASA. After some research the cause of this problem is that the ASA is inspecting ESMTP in the policy map, which is stripping the STARTTLS packets.
To bypass this you have to create a new policy map to make sure the parameters of the inspection allow encrypted connections – the default is to not allow this, and it does this by removing the STARTTLS packets.
First lets create our policy map
policy-map type inspect esmtp esmtp_map parameters allow-tls action log
Then we will modify the global policy and match this policy for inspection. In the following example, the service policy is all default – the global_policy.
policy-map global_policy class inspection_default
inspect esmtp esmtp_map
Thats it – now it will allow TLS . I had one other issue when applying I kept getting this error – ERROR: Inspect configuration of this type exists, first remove that configuration and then add the new configuration
I was getting this error because by default the “Inspect esmtp” option is enabled in the global_policy map. So first remove this inspection and then reapply. After modifying the ESMTP parameter mail started flowing. The follow shows that whole step.
NHS-ASA(config-pmap)# policy-map global_policy NHS-ASA(config-pmap)# class inspection_default NHS-ASA(config-pmap-c)# inspect esmtp esmtp_map ERROR: Inspect configuration of this type exists, first remove that configuration and then add the new configuration
NHS-ASA(config-pmap-c)# no inspect esmtp NHS-ASA(config-pmap-c)# inspect esmtp esmtp_map
Recent Comments