I needed to have a specific SSL VPN client to always have the same IP address. This is not overly simple as it seems it should be. I have read there are very neat ways to do it through FortiAuth, or Radius options – but Here I am just doing all Fortigate configuration.
I am using a local account on the firewall in this example, but it would work with an AD users without issues – you would just have to map the user directly and not use groups.
SO, in this example I have a Scan gun that needs to have a specific IP every time it connects. So an overview of the steps are:
Setup SSL VPN (Should be already done if you are trying this).
Have LDAP or Radius integration already setup if you are specifically using that.
Setup Address object that you need the device to get – For this example 10.200.253.241.
Create a user object either local, or LDAP/Radius. – In this example Bargun01.
Create a specific portal if needed just for this user.
Create group/portal matching in SSL Settings.
Create firewall policy allowing that client in.
Ok, first lets create our address object .
Next lets create our user object – We need to do a specific user object, because we only want one device to be logged in and match this policy.
Then lets create the portal specific for this device – which only needs access to one server. In this portal we will match the it to the individual IP object we created, and set the remote access server it needs. Notice that the source IP Pool is the specific IP we set – this is where all the real magic is.
Next lets match up our user to the portal.
One more thing to do – and that’s to setup our firewall policy! Notice that the user matches what we put in the portal. Very specific. That’s it.
Tracking down MACs from a switch can be very beneficial. You can use the information from the MAC table to track down where a device is plugged into, or if there is some kind of loop in the network.
This command is used from the Fortigate to drill down to the Fortiswitch. I do believe it would also work directly from the Fortiswitch.
To display the whole MAC table:
diagnose switch-controller switch-info mac-table
Lets say I need to look for the last 4 of the MAC to find exactly where this device plugs into.
I am more impressed with Fortiswitches every time I work with them. The ability to implement light NAC features, INTRAvlan firewall policies and overall management really gives these switches a feature set to checkout when deciding on new switches.
Below are the steps to quickly get the interface stats such as errors/packets, etc. The commands are ran on the Fortigate, which in this case is controlling the Fortiswitch.
Drop into CLI on the FGT and check what switches are connected by running the command
get switch-controller managed-switch
This command will bring back the names of the manged switches. Locate the switch you want to check the port stats on. For example, we will use the name “FS1D24T419001174”
Certificates for VPN, SSL Offloading (if using Load balancing), or a signed device cert expire, we all know this. Up until last week I had never updated a signed certificate, I had just created a new CSR, and rekeyed the cert. Updating the certificate the Fortigate is using is very easy, but I had problems with the syntax so I am documenting it here.
I had an issue following the doc so I though I would clear the water and see if I could help someone down the road. Lets say I have sslvpn.travelingpacket.com that will expire in 2 days – I log into my CA (godaddy in my case) and renew the cert. They send the new cert to me, but what do I do with it…
Open the cert with a text editor – maybe notepad – and copy the cert. you should see —BEGIN CERTIFICATE. Copy everything. Then log into the fortigate VIA cli – Putty or some kind of SSL client is way better for doing this then the web client. Then lets modify the certificate
config vpn certificate local
edit sslvpn (or your cert name)
set certificate “—–BEGIN CERTIFICATE—– mPjDQDYkYHKcTrGa6aH7e1w1uM7kdaBAjyAgM7xcmuTrsCeLYfd+BwIDAQABo4IDTDCCA0gwPQYJKwYBBAGCNxUHBDAwLgYmKwYBBAGCNxUIorRWhO7dYIKtkziB9KY0 >—–END CERTIFICATE—–“
and Press enter – The issues I had was with the quotes. I tried to first do double quotes, and past the cert in the middle – that does not work. Just simply type in the command set certificate and then a double quote “ and past the cert whole. After its pastes do the ending quote “ and press enter.
IMPORTANT: That’s it for modifying the cert – but to enact it we have to remove it from whatever we are using it for, and then add it back. That refreshes the cert. So if your using it for SSL-VPN , go to VPN – SSL-VPN settings – and set the server cert to a different one, press apply, and change it back.
This entry details how to create a static route in both the GUI and CLI of the Fortigate firewall. Specifically I am using FortiOS 6.2.4 but its pretty much been the same for years.
Lets start by talking through the things that will be needed to create the static route.
– Subnet – this is what we want to route to, for a default route its 0.0.0.0/0 but if we wanted a more specific route, lets say to 192.168.100.0/24.
– Destination Interface – Next hop interface we want to send traffic out of.
– Gateway address – Directly connected interface neighbor that we want the next hop for 192.168.100.0/24 to be.
– Administrative Distance– is a feature used by routers to select the best path to a destination when multiple paths to the same destination are present. Lowest AD wins and will be placed in the routing table.
Advanced option – Priority – To build on AD definition – What if two routes exist in the routing table to the same destination with the same AD? This is where Priority comes in. Lowest priority wins. By selecting a priority you can have multiple routes to the same destination in the routing table, but one would be preferred over the other. This comes in very hand for Reverse Path forwarding issues.
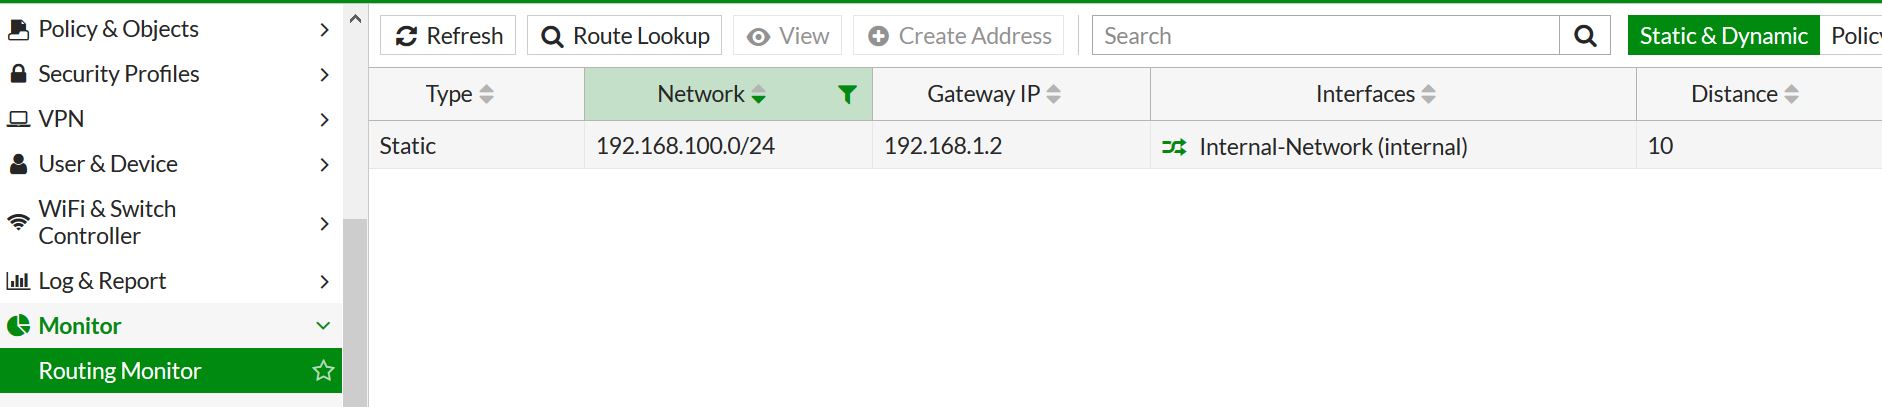
So after all that’s said, we need to route 192.168.100.0/24 to our LAN interface with a next hop of 192.168.1.2.
First lets create this in the GUI. Navigate to network – static routes – and create a new one.
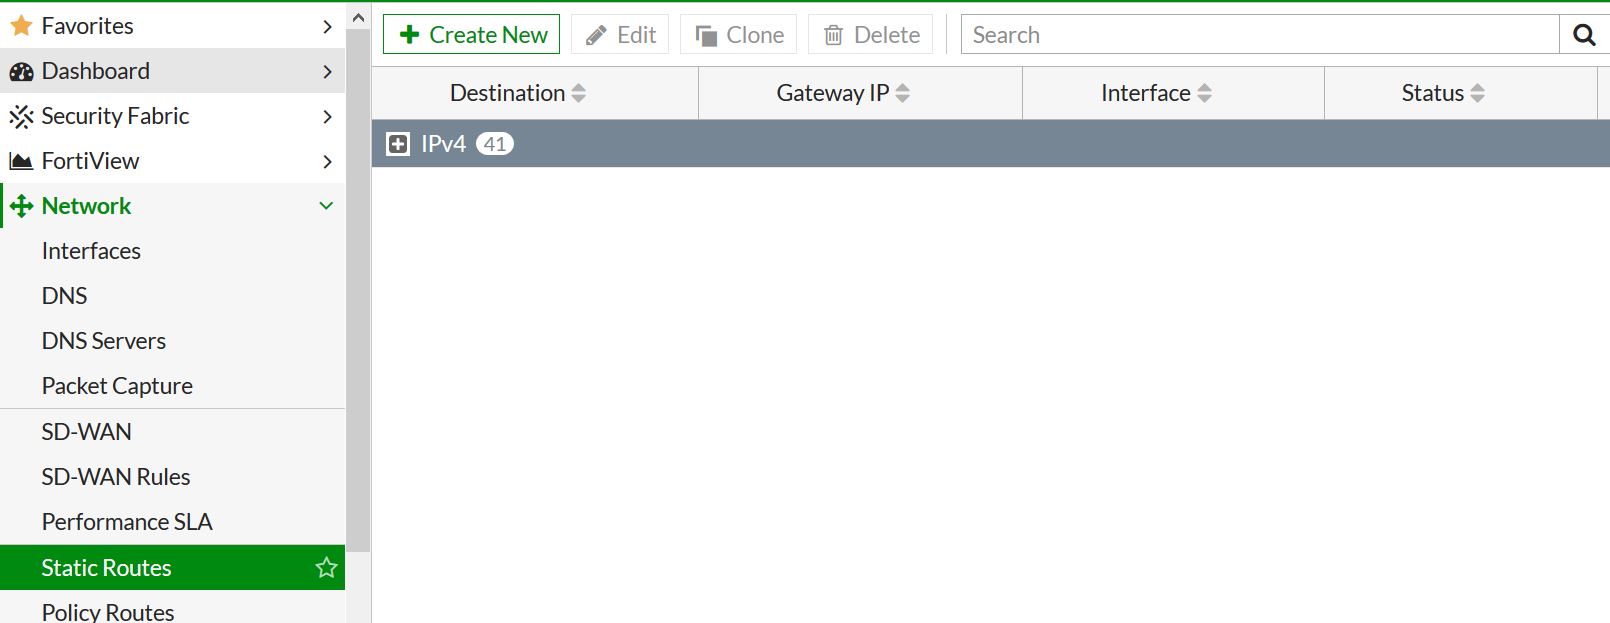
.
Now we will just insert the needed info. I am leaving the AD at 10 – which is default.
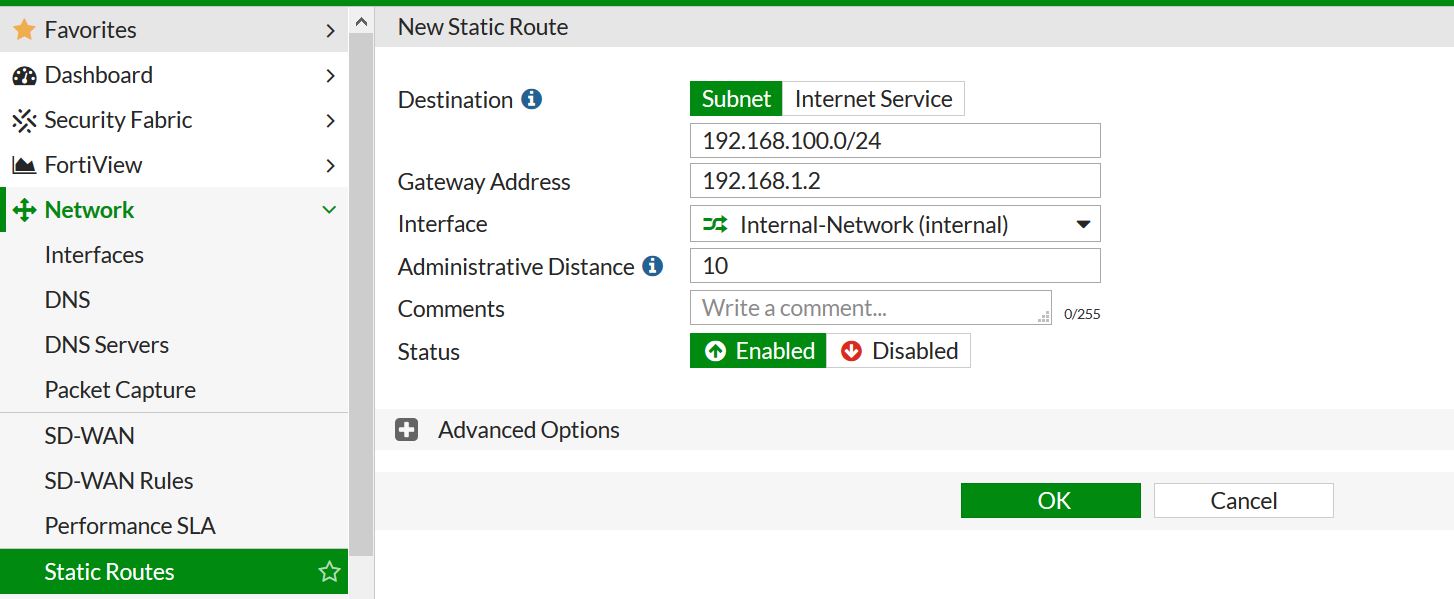
Press OK – and Bam! route created. We can check that the route has been created and is the routing table by going to monitor – routing monitor.
Next lets do the same thing in CLI.
First route creation. When you create the route edit the next available sequence number. In this case its 46.
You can see if your route is in the routing table in CLI by running the command “get router info routing-table all” but in this case I am using the static option, and grepping just what I need to see.
Fortinac is built on top of CentOS and is a great product. Recently I needed to have default or isolated vlan support PXE booting as well as isolation. This way if a computer is being imaged we don’t have to worry about hard coding ports with vlans, etc. This is important because the NAC cannot look at the client prior to the OS install.
These settings were added to the dhcpd.conf – they would work for any implementation running dhcpd not just Fortinac.
Below is the conf that works.
# Sample /etc/dhcpd.conf
authoritative;
log-facility local6;
ddns-update-style none;
allow bootp;
allow booting;
class “authenticated_clients”
{
match pick-first-value (option dhcp-client-identifier, hardware);
}
# Isolation Scope ISOL_Isolation_blackhole
subnet 172.16.172.0 netmask 255.255.252.0 {
range 172.16.172.10 172.16.175.200;
default-lease-time 28800;
max-lease-time 86400;
option domain-name “blackhole.local”;
option domain-name-servers 172.16.172.254;
option broadcast-address 172.16.175.255;
option routers 172.16.172.1;
next-server PXE-SERVER-IP;
filename “SMSBoot\\x64\\file1.efi”; — NOTICE the two slashes that represent the file path – I was missing this, and of course it could not find the file.
The options for next-server and file-name were the options needed to push PXE settings over.
Restart the service after saving the configuration to dhcpd.conf
Starting in 5.4.1 you could “Quarantine” an IP address. This means that the quarantined host cannot communicate through the firewall.
There are many different parts of the firewall the quarantine an IP address. For example the AV and IPS can both automatically quarantine an IP if it meets a defined violation.
In 6.0 you can view the IPs that have been quarantined by going to Monitor- Quarantine. From here you can see what IPs are blocked, and for what reason. As you can see in the image below 5.188.86.10 has been blocked for 26 days by an admin. If an admin blocks an IP address (as we will see) it shows up with “Administrative” as the source.The other IPs have been blocked by the IPS engine. The below image shows the monitor section.
So, lets say that you look into Fortiview and see that a remote IP is sending/receiving a ton of bandwidth and you want make sure that stops. in this example lets quarantine the IP 67.247.21.7.
In this example we can act like I was looking through Fortiview and found an issue that makes me want to block the above IP. You can just click on the IP you would like to block, right click and then select to “quarantine”. When you do this, it will pop up and ask for the length of time you would like to block them for.
The above shows that it will ban the IP from communication for the given period of time.
So, lets say we want to remove an IP address that has been quarantined – No problem, just need to go to Monitor-Quarantine and click on the IP and delete that individual or click to delete all entries.
You can modify how long and for what reason the IPS/AV quarantine an address for within the policy. For example, below shows modifying the reason/time of quarantine. The AV settings are within the CLI of the AV policy under “nac-quar”. Something to note, sources are not quarantined by default.
Within the Fortigate firewall you can modify many ping and traceroute options to suite what needs you might have. For example, if you need to modify the source IP address for a ping or trace you have that option and many more. Both ping and traceroute are crucial network troubleshooting tools. Many times I need to ping through a VPN tunnel using my internal interface, which is in the encryption domain to make sure the tunnel is up and working. or make sure the source of my ping or traceroute are on a local subnet to rule out routing/gateway issues.
The list below shows the table of ping options available:
Fortigate-Firewal # exe ping-options adaptive-ping Adaptive ping <enable|disable>. data-size Integer value to specify datagram size in bytes. df-bit Set DF bit in IP header <yes | no>. interface Auto | <outgoing interface>. interval Integer value to specify seconds between two pings. pattern Hex format of pattern, e.g. 00ffaabb. repeat-count Integer value to specify how many times to repeat PING. reset Reset settings. source Auto | <source interface IP>. timeout Integer value to specify timeout in seconds. tos IP type-of-service option. ttl Integer value to specify time-to-live. validate-reply Validate reply data <yes | no>. view-settings View the current settings for PING option.
So to highlight a few of these options – Lets modify the source address we are pinging from, increase the amount of pings and then show the settings to confirm all is set.
Ping Options: Repeat Count: 1000 Data Size: 56 Timeout: 2 Interface: auto Interval: 1 TTL: 64 TOS: 0 DF bit: unset Source Address: 192.168.1.1 Pattern: Pattern Size in Bytes: 0 Validate Reply: no Adaptive Ping: disable
I removed the default settings it spits out for brevity. That’s it though, we now have changed the source and the repeat count. Lots of other cool settings like ToS and size available.
Now on for Traceroute – You have less options, but the main two that I use – modifying the source IP or interface and setting the amount of hops it will go.
Fortigate-Firewall # exe traceroute-options device Auto | <ifname>. queries Integer value to specify number of queries per hop. source Auto | <source interface IP>. view-settings View the current options of traceroute.
Lets set the source for the traceroute to 192.168.1.1 and then check the settings.
Recently I had an issue with a SSL VPN user who could not connect to the Fortigate. This problem started after upgrading the Fortigate from a very old 5.2.3 to the latest 5.4 firmware – 5.4.7.
Everything went great with the upgrade,but the client would bomb out at 40 percent with “VPN server maybe unreachable” when attempting to connect. After some diagnostics on the firewall I found the user could authenticate, and reach the FW. I then debugged the SSL VPN application and found that the following logs appeared. Note – I changed the IP from the real to 1.1.1.1
Notice that TSLV1-0 is disabled – this great for security as TLS 1 and 2 are much more secure than 0, but in this case the client was not trying to use 1-2 but only 0.
RESOLUTION
So the Forticlient is using the security settings within Internet Explorer. The fix was to make sure that IE supported the necessary protocols. On the client that was not working I opened up IE – went to settings, then to advanced. Check the settings out –
I enabled TLS 1.2 (you could also do 1.1) and and tried to reconnect – all worked great. Check out the debug after enabling:
[16143:root:2e39]SSL state:SSLv3 read client hello A (1.1.1.1)
[16143:root:2e39]SSL state:SSLv3 write server hello A (1.1.1.1))
[16143:root:2e39]SSL state:SSLv3 write certificate A (1.1.1.1))
[16143:root:2e39]SSL state:SSLv3 write key exchange A (1.1.1.1))
[16143:root:2e39]SSL state:SSLv3 write server done A (1.1.1.1))
[16143:root:2e39]SSL state:SSLv3 flush data (1.1.1.1)) [16143:root:2e39]SSL state:SSL negotiation finished successfully (1.1.1.1) [16143:root:2e39]SSL established: TLSv1.2 ECDHE-RSA-AES256-GCM-SHA384
Fortigate firewalls are stateful by design, this means that when a client behind the firewall talks to lets say Google a session is created – If all security policies are met. Google’s return traffic can automatically come back into the client, following the same path (Session) without having to explicitly have an access rule that allows that traffic. This is also very beneficial in security because the firewall keeps track of that session, makes sure all traffic is flowing on the session as it should, and will close the session if needed. When the session is closed Google cannot talk to our internal host anymore without following very specific rules that would allow communication from them.
With remote APs, Video streams, any many more (Specifically UDP streams) I see problems a lot with sessions getting created on the WAN (Default route) for RFC-1918 private subnets. When this happens internal clients – Maybe APs – cannot talk back to the controller or the UDP video encoder cannot find the decoder any more, but other clients can communicate with those devices just fine.
The reason this happens is that most of the time the IPSEC VPN tunnels or MPLS/E-LAN interfaces have static route assigned to them for getting to the other side subnets. If the physical interface or VPN interface drops then what routes exist in the routing table? Thats right – just the default which in turn sends all traffic even for private subnets out to the internet. Lets take a UDP video Stream between two locations for example -UDP never needs an acknowledgement of the traffic, so it keeps blasting traffic to the session – when the session gets created to the internet
When those interfaces or tunnels come back online all should work, and will unless traffic never stops flowing, which is where our problem lies. When traffic tries to flow when all interface routes are down, then the only route left is the default – so the session gets created on the WAN interface.
To clear these sessions and fix the issues there are a few options.
1 – clear all sessions of the firewall
2 – create session filter and only clear the sessions you need to .
There are many other reasons to clear sessions than the reason I mentioned above. So lets get to commands!
First you can show sessions on the firewall by using:
Status will show you how many active sessions you have on the firewall and List will print out the individual sessions.
When you select list you get the following information
So for this example lets check out the session created from my internal host 10.3.0.1 going to 104.197.225.108 (www.mirazon.com).
So we see that just by going to http://www.mirazon.com it opened 6 session, these are all going to the same destination IP/Port but coming from different source ports. Option 1 was we could clear all sessions from the firewall – the command to do that is:
diag system session clear
In this example, lets say I want to clear only sessions going to IP 104.197.225.108. We need to create a session filter and then clear only those. Here are the following options on creating filters
Lots of options – one of the coolest in my opinion is matching on Protocol! But in this case lets match by destination IP.
Thats it! now we have cleared all sessions going to that IP.
NOTES
A few things to note – The firewall will clear out a session if it does not see a keepalive. It will do that every 3600 seconds by default – this means if a voice call is going on through the firewall then it might close the session after 3600 seconds – this can be a big problem. The “dia system session list” is a great way to find a session and see when it will expire. Great way to troubleshoot – you can also use the GREP keyword to help find exactly what you want.
Recent Comments