The Fortigate firewall has a limitation of 10 LDAP servers that you can have on one FGT to do look ups. Normally this is not a problem in the least. Unless you have over 10 domains that you need to do lookups on. To get past this limitation there are a few options, one – Fortiauthenticator, or another option is to use Radius, and authenticate against all the domains. The latter is what I chose. I needed this to authenticate many user groups for different domains for the SSL VPN. So this is Radius authentication for the SSL VPN.
So setting up Radius, and the Fortigate to use radius for authentication was no problem. What was a problem though, was sending the group that the user should be in over to the radius server. I found that if I set the remote server group under the user group properties that authentication would fail. If i removed the group all would work perfectly but if you have multiple network policies on the Radius server, and maybe a user lives in two different policies then there’s a chance that it could authenticate incorrectly and give access to a user who should not have it. This could be bad.
After doing a lot of research I found that Fortigate should be sending in the group when configured under the user group as an attribute value pair, and given the NPS server understands how to handle the attribute it should work very nicely. I found the documentation on this KB article to be very old so I am writing my own, which you are reading.
So to recap what the below shows:
- Creating a radius server int the FGT
- Creating a user group, which references the Radius server, and then specifying a user group to match in Radius (NPS)
- Creating the radius policy, with the needed attribute pair within NPS.
- Results in Wireshark and exactly what is happening
Below are the links from Fortigate:
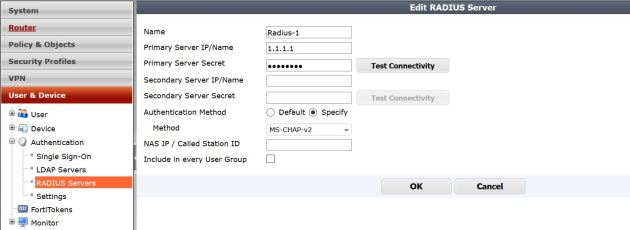
First lets setup the Radius server in the Fortigate
Below is the image of my Radius server setup – pretty simple. Take note that I changed my authentication method from default to MS-CHAP-V2, this is what I set on my NPS server.
Next lets setup the user group. Notice this is a firewall group. You also have to manually type the user group since it does not exist .

I will omit the sections showing creating the SSL VPN tunnel policy, and the IPV4 policy allowing traffic in.
Now lets modify NPS. We will have to add a vendor specific attribute for the group name, and then match that in our policy.
Fortigate lists their attributes as below. Lots of cool options you could add like Vdom.
VENDOR Fortinet 12356
BEGIN-VENDOR Fortinet
ATTRIBUTE Fortinet-Group-Name 1 string
ATTRIBUTE Fortinet-Client-IP-Address 2 ipaddr
ATTRIBUTE Fortinet-Vdom-Name 3 string
ATTRIBUTE Fortinet-Client-IPv6-Address 4 octets
ATTRIBUTE Fortinet-Interface-Name 5 string
ATTRIBUTE Fortinet-Access-Profile 6 string
In NPS we have create our policy to grant access to the group we want. That’s no problem. I will omit steps to add the Network policy to allow access. After we get all the policy options we want , and select the group we want to grant access to we need to configure a Vendor specific option to match the group to the Fortigate.
Below are the pictures of exactly how to do that.
on the settings part of the Network Policy, click on “Vendor Specific” and select the option to add one.

Add the vendor specific attribute

Now lets configure our needed vendor/attribute. , and set it in the policy. Notice that we are entering the Vendor code that Fortinet gave to us through those links. Then we will configure the attribute itself.

Here we are filling in the values for the attribute. VPN-Users is what I am matching for my attribute string. If the user is not in the group VPN-Users, then it should deny them.

Thats it! our attributes are in and if the user is not specifically in the group VPN-Users then they will be blocked from accessing the VPN.

Under the hood
So what is actually happening here? it seems that when the user attempts to log in, the Fortigate will query the radius server and send the user credentials over and if access is granted – will allow the user to log in.
In Fortinet documentation they show that the Fortigate will be sending the group over to the radius server, if it matches the Vendor attribute we set, then access is granted. This is not what I have found to be the case (could be wrong). What I have seen happen is, the user attempts to login, Fortigate send the user creds to Radius , the Radius server grants access to the user (if the user meets the policies) and sends the group specified in the Vendor attribute back to the fortigate. The Fortigate then checks to see if that attribute matches what is configured in the Fortigate user group. If that matches, it allows the user to login.
To back this up – check out these Wireshark logs.
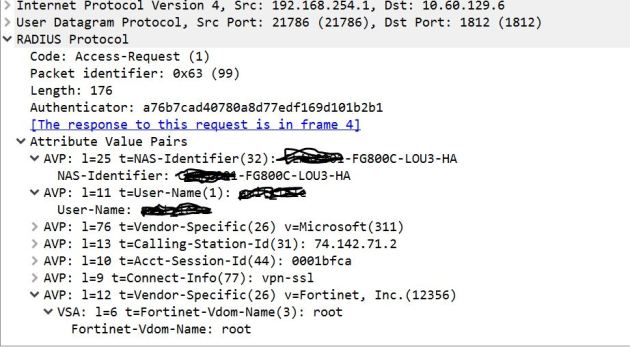
Fortigate to Radius server –
Notice that the User name is sent, but no group name
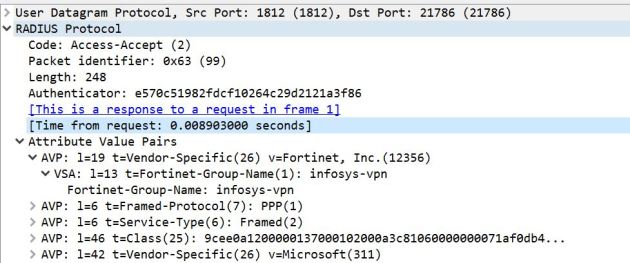
Radius response to Fortigate – Notice the group name (which in this case is infosys-VPN) that group is what in this example is being matched by the Fortigate, and the code of Access-Accept.
To go even further I have tested by removing the group or changing it to something other than whats in the Fortigate and it will fail, even though radius said the user was accepted. When running those tests where I change the group that was passed back to the Fortigate, I got an error on the FGT that said the user group was wrong.
So in the end, the Fortigate is making the decision to allow the user to authenticate based on the user group after radius allows the user based on credentials and policy.


