Tag Archives: Fortinet

Fortigate VXLAN Encapsulation over IPSEC

VXLAN is a Layer2 overlay scheme over a Layer 3 network. VXLAN uses MAC Address-in-User Datagram Protocol (MAC-in-UDP) encapsulation to provide a means to extend Layer 2 segments across a layer3 segment. This basically means the layer2 packet gets a VXLAN header applied, then that frame gets encapsulated into a UDP IP packet and sent over to the layer3 network.

In later FortiOS 5.4 firmwares VXLAN (Virtual Extensible LAN) encapsulation was added. This is a great technology that can help connect to sites at layer2 over layer3. Something to take note of – as of FortiOS 5.6.2 – lots of improvements and enhancements to VXLAN encapsulation have been made. For example, vlan trunking works well now. Mutlicast also will traverse the VXLAN!

So far I have set this up for two different clients. Both were situations where we had to have layer 2 stretched for a certain purpose. in the last case it was to two different data centers. Below is the scenario and config of the Fortigates as well as show ARP/MAC from the Cisco switch. Fortinet has some great documentation as well on this feature (Links below).

http://kb.fortinet.com/kb/documentLink.do?externalID=FD38614

http://kb.fortinet.com/kb/documentLink.do?popup=true&externalID=FD40170&languageId=

Below shows our simple layout. The red line indicates the VXLAN encapsulation path. Encapsulation only happens at Fortigate firewalls.

layout

Here is a check lists of things that are needed:

  • Create VXLAN VPN
    • Local encap-local-gw4 is the public address on the local FW
    • encap-remote-gw4 is the peer address of the other side
    • remote-gw is the peer address of the other side
  • Then create a new Switch interface
    • Add both the local network, and VXLAN-VPN interface to this switch
  • Create firewall policies allow traffic

Thoughts and observations:

  • Lowering the MTU of the VXLAN/internal interface might be a good idea. The VXLAN encapsulation adds around 50-bytes. Most Cisco documentation will mention increasing the MTU, but since we are going over the net with this, increasing MTU means lots of fragmentation.
  • No IP address on the Switch interface is needed. Actually I have seen small issues when putting an IP address on the interface.
  • In CLI use the commands below to help get broadcasts (be careful) and ARP to go across.
    • config sys int
      • edit VXLAN
        • set l2forward enable
        • set broadcast-foward enable
        • end
      • end
  • In 5.6.2 VLANs tags will pass through the tunnel

CONFIG

SIDE 1 (60D)

config vpn ipsec phase1-interface
edit “VXLAN”
set interface “wan2”
set peertype any
set proposal aes256-sha1
set encapsulation vxlan
set encapsulation-address ipv4
set encap-local-gw4 1.1.1.1
set encap-remote-gw4 1.1.1.2
set remote-gw 1.1.1.2
set psksecret password
next
end
config vpn ipsec phase2-interface
edit “VXLAN_ph2”
set phase1name “VXLAN”
set proposal aes256-sha1
next
end

config system switch-interface
edit “VXLAN-SWITCH”
set vdom “root”
set member “internal1” “internal2” “VXLAN”
next
end

Lets look at the Switch in the gui

60d-switch

Then lets check out the Firewall Policies

firewall policies

SIDE 2 (60E)

config vpn ipsec phase1-interface
edit “VXLAN”
set interface “wan1”
set peertype any
set proposal aes256-sha1
set encapsulation vxlan
set encapsulation-address ipv4
set encap-local-gw4 1.1.1.2
set encap-remote-gw4 1.1.1.1
set remote-gw 1.1.1.1
set psksecret password
next
end
config vpn ipsec phase2-interface
edit “VXLAN_ph2”
set phase1name “VXLAN”
set proposal aes256-sha1
next
end

Lets look at the Switch in the Gui

60-e interface

Next lets check out the Firewall Policies

fw-60e


Testing

First make sure the VPN is up and working. Then a simple ping test between two devices on the same subnet will be enough to make sure things are working. TCP is always the best way to test . You can also check and make sure that the ARP/MAC address tables on each side show something on the remote side. For example the below shows the ARP/MAC of the Cisco 3650 switch at the Datacenter side (60D).

Datacenter-Stack#show arp

Protocol  Address          Age (min)  Hardware Addr   Type   Interface

Internet  192.168.19.21           0   000c.291c.b2a5  ARPA   Vlan1


Internet  192.168.19.51           0   000c.2918.b8be  ARPA   Vlan1  – 19.51 lives behind the 60E

Datacenter-Stack#show mac address-table
Mac Address Table
——————————————-

Vlan Mac Address Type Ports
—- ———– ——– —–
1 000c.2918.b8be DYNAMIC Gi1/0/1  — Fortinet 60D is connected to gig 1/0/1


Conclusion

Thats it! VXLAN is an open source protocol that is a great datacenter technology. Fortinet makes it very easy to get this up and going within a few minutes. EB

Fortigate – Changing outbound nat IP with IP Pools

Sometimes it is necessary to change IP address used to talk with the internet that the internal client is using. For instance it is always important to make sure your SMTP server is using the same outbound IP used for inbound traffic. I have seen this cause a good many mail servers to be blacklisted by ISPs. In the following entry we will change the IP the client is using for outbound nat.

This technique has many awesome benefits, you can nat into this IP (IP pool) only when going to a certain destination.. etc. For example, if you had to change your source IP when accessing a destination across a VPN tunnel. That example might be very important in a medical field where I have found you almost always have to nat your private traffic to a public address when accessing the VPN hosts.

The internal client address is 10.64.16.10, external IP is 1.1.1.1. In this example I only want this one internal client to be natted out of 1.1.1.1

So we have to create a Virtual IP pool . We create the Virtual IP pool by going to Policy and objects – objects – IP Pools

IP pool-create

We then can setup the pool. Notice the options

– Overload allows PAT, so many ip addresses, to one public.
– One-to-One allows one IP to that public IP
– We also have the option to nat into a Public Range of addresses

We also want this device to answer VIA Arp for 1.1.1.1

Now lets create our IPv4 Policy to allow our private IP address to be allowed to the internet (WAN1) and to be natted VIA this IP pool. I created the address object for my private host already.

policy-creation

So after creating our IPV4 policy, we have one thing left to do – make sure this is one of our first policies hit when 10.16.64.10 tries to access the internet. So lets make sure its at the top of our list, or at least above our default nat rule.

above

That’s it! if you now go to a site such as ipchicken.com or whatismyip.com you will see 1.1.1.1 if you are coming from 10.16.64.10.

Blocking geographic regions in Fortigate 5.4

The best docs are always at docs.fortinet.com

Sometimes I get asked by clients how to block know attacking countries like Russia, or China from accessing their websites. I often hear that only US connections would be accessing their services so why allow others who might not be on the up and up.

Of course most attackers might pivot from compromised computers in the US, and thus bypass this security feature, but either way its not a bad idea. The below gives a good example on how to create a firewall “country” group and then block those countries from accessing any services hosted through the firewall. This will be done in Forti-OS 5.4.0. Its really the exact same steps in 5.2.

Also, there are many ways to do this. Instead of blocking Geographic regions you could only allow the ones you want to give access to.

Before beginning it might be a great idea to check out the new Fortiview feature to see what countries access your services the most. Under Fortiview- you can now see the countries tab.

Monitor-Countries


Great, so in this example lets block the region of China – I know its not one of the top countries accessing my services.

First lets create the address object that we want to block. In this case I am setting the name of the address object as the country I am blocking. After creating the country object, I will create an address group call “Country blocks” add this to my firewall policy. That way in the future if I want to block Ireland, I can just add that object in the group and I am done.

Creating the address object for “China”. First go to “Policy & Objects” and create a new object.

create address

Next we will fill in the needed info, and change the address type to “Geography”.

China

Now lets great that group, and add the “China” object to it.

Country-Group

Awesome, now just one more step – creating the firewall policy to block this address group.

block-policy

Press OK, move this policy to the top of all WAN-LAN or your interfaces policies. This way it gets hit before anything else.

There are more ways than 1 to do this. when allowing traffic into your VIP or policy you could instead specify only the allowed countries.


Foritgate 5.4- Changing the interface theme

In 5.4 you now have the option to change the interface color. This is a great setting, because I am not a fan of the emerald green interface that’s default.

This is a great option, and easy to change.

To change the color just navigate to System – settings. At the bottom under view settings you will see the option to change the theme. There are currently 4 colors available. Green, red, blue, and my favorite Melongene. Good Job Fortinet!

Below are screenshots of how to do this.

Default color theme:

color-1

Changing the theme to Melongene

color-2

Creating a Fortigate Virtual IP – External to internal Port Forwarding

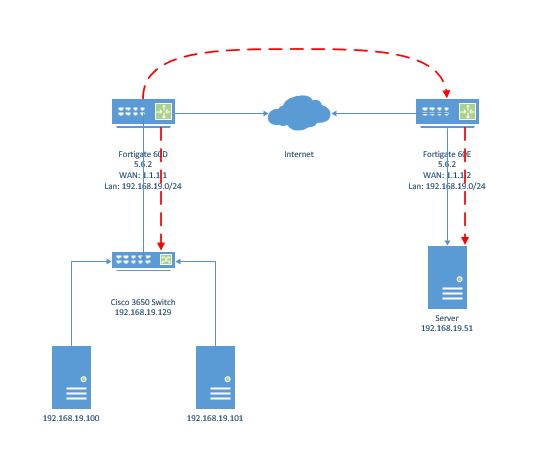
Hello, I noticed one thing I have never created a blog entry on creating a Virtual IP to allow access from the internet into a local server. This entry is for  a VIP and Policy creation on firmware 5.2> . Remember all the best documentation is located at docs.fortinet.com

So what is a VIP, a Virtual IP is one way to allow external traffic going to a Public address to be forwarded in to a Local server with a Private address. Basically, its a NAT object consisting of external IP and port and  Internal IP and port. Before this firewall will allow traffic to access the NAT object (VIP) it needs to have a Firewall policy allowing the destined traffic to the VIP.

So, lets create a VIP. First lets navigate to Policy & Objects, Objects, and Virtual IPs. Lets create a new object.

location

Now, lets input the information needed to have external connections reach our internal network. In this example my outside web server listening address is 2.2.2.1 (my fake public IP) , my internal web server at 172.16.1.10 and my answering interface (the interface accepting connections) is WAN1 (QXnet). So, start out naming the VIP something that will have meaning to you. Then select the incoming interface, and apply the correct IP information. You will then have the option to do a port forward (1 port or a range forwarded into the server), or a 1-1 nat, where all ports are forwarded. If you do a Port Forward, select the protocol, and then set the ports.

Vip-Creation

In this example I am allowing port 80 on my public IP to be forwarded to port 80 on my private server.

Great, we have created the VIP object. But, as of now no traffic will be allowed to go to the private server. We have to add a Firewall policy to allow that traffic to the VIP.

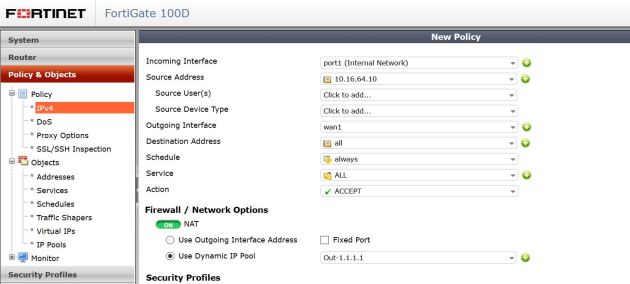
Lets navigate to Policy & Objects, Policy, IPV4 then create a new policy.

Below shows the settings. The settings read like this : Incoming Interface – This would be where traffic is coming from, in this case the WAN1 interface. Source address: this would be the actual address its coming from, in this case it could be anyone on the internet, so I will select all. Source users, and devices can be left blank. Outgoing interface: this is were the traffic is going, in this case its going to my server located on my LAN interface. Destination address, this is the tricky part. The destination address will be the VIP you created. In 5.2 notice the ICON. Its different then normal address objects, thus specifying, if your name didn’t, that this is a VIP.  You then have to specify the server you want to allow in, I am creating the VIP to allow HTTP into the network, so I will only specify HTTP traffic to be allowed in.

For traffic coming into the firewall we do not need to NAT this traffic, please turn this off. In 5.2> it is on by default when you create a policy.

If you require any UTM features to be on, this is the time.

Policy

That’s It! Fortinet makes it very easy to create these VIPs.

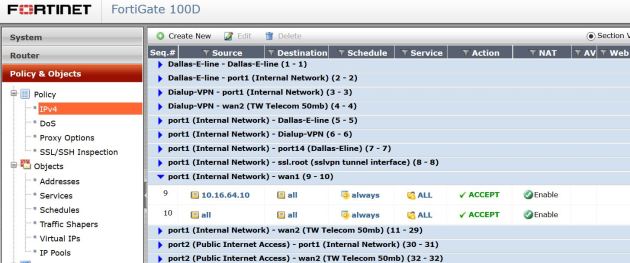
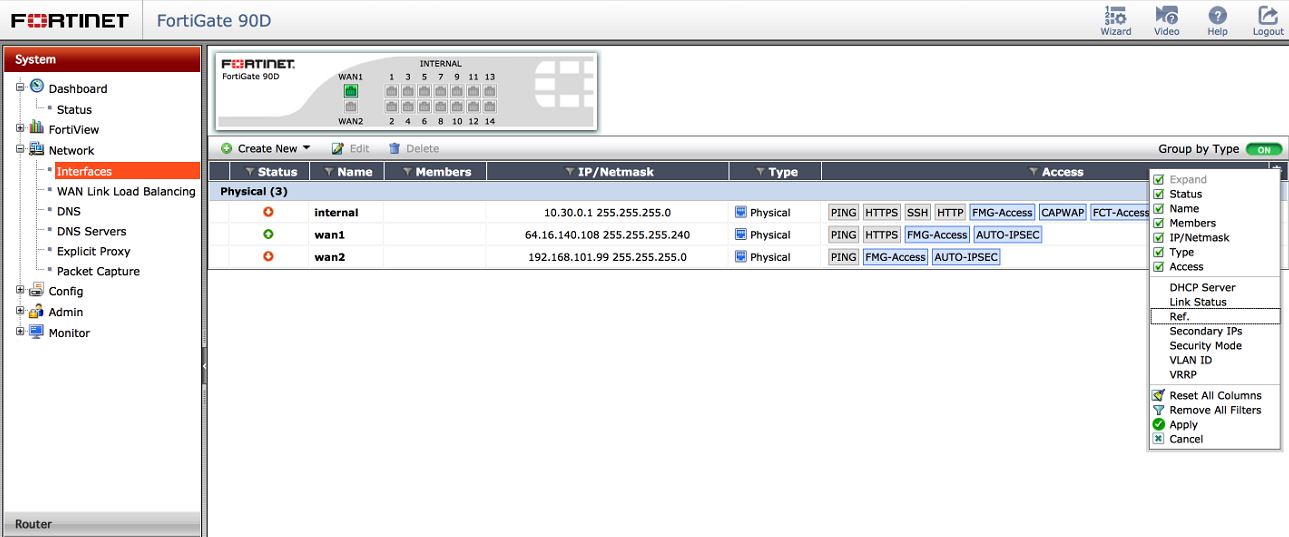
If you are not sure if your VIP is working, there are many ways to check/troubleshoot. One way would be to test it, does your server answer? You can also do an online port scan using any many tools online. you can also check the hit counts on the policy (See below). The hit counter should be there by default, but if not add it in by right clicking on the tool bar and selecting Count as one of your columns. I have used the hit counter many times to troubleshoot my VIPs not working. For example, if I try to access my server VIA the public IP, and I get hit on my policy – I know that everything is correct on my VIP. I will then make sure my ports/server settings are correct. You could also do more advanced troubleshooting like debugging the traffic, or do a packet capture on the firewall.

hit-count

Fortigate changing Switch/Interface mode

The entry is written for a 90d, but will work the same for a 60d or 80d, even some C models.

By default the Fortigate is in “Switch mode” you will only be able to see the “internal” switch, and cannot add or remove interfaces from this switch. In this mode you can add more switches, but not remove the current ports.

In the next few parts we will change the switch mode to interface, and be able to add/remove ports and switches.

Before doing anything to the Firewall make a backup. When we actually change the interface mode it will delete the IP address on the internal interface. So connect to a WAN or DMZ port and use the GUI, or make sure to be consoled into the firewall VIA the serial port (console).

First we need to remove any reference to the “internal” switch itself. If you have a default config then there will be only two. The internal->WAN policy, and the DHCP server under the “Internal” interface.

You can see all references attached to the interface by navigating to System-Network-Interfaces and modifying the settings to show the Reference tab.

int refJPG

once those references show up, you can click on the number and navigate to the exact location of that reference. For example, let say you added an address object a long time ago and added the interface. Bingo – shows you exactly where.

After removing all the references by deleting them (yes, deleting.. so make a backup!) you should now see a 0 balance in the references. We can now change the interface mode in CLI.

You can either do this through a terminal such as putty, or through the GUI CLI app. Remember after changing the interface mode, it will delete your IP address on the internal network. So do this VIA Console, or go to the GUI on the WAN or DMZ interface.

interface mode

Commands are:

config system global

set internal-switch-mode interface

end

Then click y to reboot the firewall, when it comes back it will be in interface mode.

Once it is back up, login VIA the GUI on either the WAN1, WAN2, or DMZ ports. Then you should see something like this:

broke-interfaces

Now, under this page System-Network-Interfaces  lets click the “Create” Button. From here you can create your switch. Select the type as Software or hardware switch depending on your model. You can also add your ports, set the name of the interface and the IP.

internal-switch

Once you press OK, you should see your new interface listed under system-network-interface as seen below

show-switch

Recreate all of your policies, to allow access to and from and everything should work great. If you have any questions or I failed to explain anything please let me know.

Fortigate 5.2+ SSL VPN Address

You can use a different IP address to answer for the SSL VPN.

Lets say that your interface IP (The default IP address that is used with the SSL VPN) already has HTTPS (443) forwarded in to a internal server, and you really want the SSL VPN port to be 443. You have an option.

You can add a secondary IP  address under the WAN interface that does not have a reservation already for 443. Then use this IP address for the SSL VPN.

To do so:

secondary-ip

Add your secondary IP address – Note this has to be a public address, given to you by your ISP..

Then go into the VPN settings and modify the port for what you want. Notice that the address it says will work is still the primary IP, even though the secondary will work just fine.

ssl-settings-second

Fortigate – How to create a default route with a dynamic connection.

Recently I needed to make sure select traffic would flow over a certain ISP link. Unfortunately that link had a dynamic address, which meant the address and gateway of that route could change anytime. Also I wanted to have my primary ISP failover to this link if needed.

To accomplish these things I needed to have both default routes in my routing table at the same time. This means that they both have the same distance, but different priorities. One way to accomplish this is to configure a static default route, and just change the priority of the link , but how can you do this when you do not know the gateway?

You can create a dynamic-gateway static route in the Fortigate.

dynamic-route

Through CLI you can create a dynamic gateway route using the above syntax.  Remember, the higher the priority the less preferable the route.

You can also create basically the same thing under the interface of the WAN link by using the distance, and priority interface commands listed below:

cin-interface

So now if we check our route monitor:

cin-routes

We have both default routes, and can successfully use a policy based route to push the needed traffic out.

How to get Fortigate interface statistics such as errors/discards

There are two really good ways to pull errors/discards and speed/duplex status on FGT. One method is running the CLI command:

diag hardware deviceinfo nic X – Where X would be the port, for example wan1

Results:

Glass-B # dia hardware deviceinfo nic wan1
Description :FortiASIC NP6LITE Adapter
Driver Name :FortiASIC NP6LITE Driver
Board :100EF
lif id :2
lif oid :66
netdev oid :66
Current_HWaddr 00:09:0f:09:00:15
Permanent_HWaddr 70:4c:a5:1c:97:ee

========== Link Status ==========

Admin :up
netdev status :up
autonego_setting:1
link_setting :1
speed_setting :10
duplex_setting :0
Speed :1000
Duplex :Full
link_status :Up

============ Counters ===========

Rx Pkts :10168446
Rx Bytes :11555061952
Tx Pkts :7135911
Tx Bytes :1372048635
Host Rx Pkts :9869349
Host Rx Bytes :11069429016
Host Tx Pkts :6928881
Host Tx Bytes :1304248922
Host Tx dropped :0

On 1500D’s and other large devices the command is a little different. See the bottom.

on 1500D’s it seems the command changes a little bit to : “diag hardware nic port40“— this was the results from a 1500D that is running 10 gig. The output is at the bottom.

Second way

I started doing some research and found that there was a command that would drop you down to a very limited Linux shell. There are a few commands that are support such as “ifconfig”. This blew me away. I have been wondering if there was a command like this for a long time.

Log in through CLI, and run ” fnsysctl <command>” for example “fnsysctl ls”.

So to get the interface stats, I would just run: “fnsysctl ifconfig port16” or whatever port you want to look at.

fnsysctl

And there we go. I have search for some other ways to get this, and have not found anything. If someone finds something better please pass it along.


Output from 1500D

FGT# get hardware nic port40
Description :FortiASIC NP6 Adapter
Driver Name :FortiASIC Unified NPU Driver
Name :np6_1
PCI Slot :0000:0d:00.0
irq :40
Board :FGT1500D
SN :FG1K5D3I15800578
Major ID :3
Minor ID :0
lif id :19
lif oid :171
netdev oid :171
netdev flags :1303
Current_HWaddr 00:09:0f:09:00:24
Permanent_HWaddr 08:5b:0e:e3:45:1f
phy name :port40
bank_id :3
phy_addr :0x1f
lane :3
flags :804006
sw_port :8
sw_np_port :12
vid_phy[6] :[0x7f][0x29][0x00][0x00][0x00][0x00]
vid_fwd[6] :[0x7e][0x00][0x00][0x00][0x00][0x00]
oid_fwd[6] :[0xd9][0x00][0x00][0x00][0x00][0x00]
========== Link Status ==========
Admin :up
netdev status :up
autonego_setting:0
link_setting :1
link_speed :10000
link_duplex :1
Speed :10000
Duplex :Full
link_status :Up
rx_link_status :0
int_phy_link :0
local_fault :0
local_warning :0
remote_fault :0
============ Counters ===========
rx_error :0
rx_crc_error :0
rx_carrier :0
rx_oversize :0
rx_undersize :0
tx_collision :0
Rx Pkts :109497620
Rx Bytes :150634406914
Tx Pkts :74293345
Tx Bytes :42164760114
Host Rx Pkts :30734166
Host Rx Bytes :38611688664
Host Rx dropped :0
Host Tx Pkts :41309687
Host Tx Bytes :20219939267
Host Tx dropped :46
sw_rx_pkts :109497628
sw_rx_bytes :150634408123
sw_tx_pkts :74293361
sw_tx_bytes :42164761592
sw_rx_mc_pkts :301
sw_rx_bc_pkts :970
sw_in_drop_pkts :0
sw_out_drop_pkts:0
sw_np_rx_pkts :92470644
sw_np_rx_bytes :80482907648
sw_np_tx_pkts :143654631
sw_np_tx_bytes :183360431151
sw_np_rx_mc_pkts:136
sw_np_rx_bc_pkts:502
sw_np_in_drop_pkts:5708
sw_np_out_drop_pkts:0


Fortigate and VRRP

Fortigate supports many HA options. They have a great active/passive HA option, as well as Active/Active. VRRP is another option that is supported. VRRP (Virtual Routing Redundancy Protocol) is a open standards protocol that helps eliminates the single point of failure for a network by allowing another device to take over routing automatically.

Basically one router is the Master (active), the other is a Backup (passive), the selection of which device is active or passive is based priorities of each device, highest priority (1-255) is the most preferable. The priority of 100 is default, and 255 the best. There is a heartbeat which is just a Multicast packet,  that goes across a link that both devices use (normal lan link is fine). If for some reason that heartbeat is lost , then the backup router will take over as the master.

VRRP is a great way to make sure that if one router fails the passive router will become active and take over routing for the network.  VRRP creates a virtual mac address that is shared between the two devices, the active device answers for the virtual mac and takes control of the Virtual IP that is also shared between the two.

You can use VRRP to load balance traffic as well. Load balancing is achieved by using to different VRRP groups, and balancing which router is primary for what group. The below image should help clarify what I mean.


Image

You can use those two VRRP groups as primary and secondary’s for the default gateway in different vlans. So in this case, you could have Vlan 10’s default gateway on Fortigate A, and Vlan 20’s on Fortigate B, therefore having fail-over for both, but splitting up the load. This might be a great thing to do if you have a HA cluster of 60C’s, and they just cant handle the full traffic load in a HA scenario. Remember. each config is different on these firewalls, there is no config sync. There is an option to sync sessions between the firewalls, so that if one firewall were to fail, things would pick right back up and not have to establish the sessions again.

Things to note in this config – There is already an IP address assigned to the Vlan interface for management when when the VRRP address might not be active. I am also using the Preempt option to make sure Active is always Active if its online. The Physical interface the Vlans are configured on are trunks on both links going to Fort-A, and Fort-B.

Config time:

The config for VRRP is interface based, and CLI only.

Fortigate A:

config system interface

edit vlan-10

config vrrp
edit 10
set vrip 10.10.10.1
set priority 255
set status enable
set preempt enable
end
set vrrp-virtual-mac enable
next

edit Vlan-20
config vrrp
edit 20
set vrip 10.10.20.1
set priority 100
set status enable
end
set vrrp-virtual-mac enable
end

Fortigate B:

config system interface

edit vlan-10

config vrrp
edit 10
set vrip 10.10.10.1
set priority 100
set status enable
end
set vrrp-virtual-mac enable
next

edit Vlan-20
config vrrp
edit 20
set vrip 10.10.20.1
set priority 255
set status enable
set preempt enable
end
set vrrp-virtual-mac enable
end

This config will do exactly what we want, create a Virtual IP that is shared, and make sure the configured active (priority) unit takes back over the role of active if it goes offline and comes back online (preempt),