As always docs.fortinet.com has the best information.
Firewalls almost always interface with the internet, and most of the time we enable remote access from the internet to make our lives easier when troubleshooting an issue, and maybe not being behind the firewall at the time. The best why to secure the device is just not enable access from insecure locations, but some times we have to enable it.
There are a few simple things we can do to help elevate vulnerable spots when allowing access from the internet.
- Enable a password policy
- Modify lockout policy/duration if needed
- Allow admin access from only Trusted hosts
- Modify default access TCP ports
- Create a new admin account named something different, and then delete the default admin account.
- Make sure a log in banner is active – Certain cyber laws need explicit notification that the user attempting login should have authorization.
- Use dual factor authentication to gain admin access to the device.
- Logging , always logging!
This blog is written with both 5.2 and 5.4 firmwares.
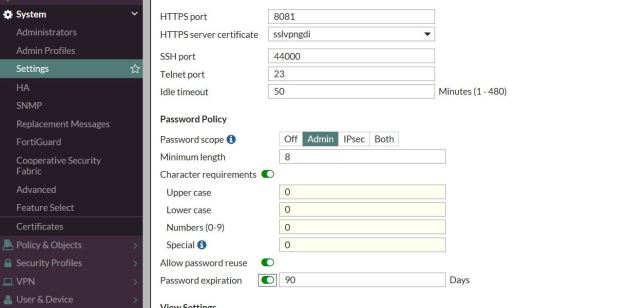
Enabling a password policy
This is great to do if you have multiple accounts on the device. This way a user cannot change their super complex password to something with 3-4 letters. A password policy enforces certain specifics to the password. For example you can set the character requirements as well as password reuse/expiration. Check out the below images for 5.2 and 5.4. Notice you can enable this for VPN accounts and admin accounts.
5.4
5.2

Login failure lockout duration and Threshold
When you mistype your password 3 times by default you are locked out of the firewall for 5 minutes (All docs say 60 seconds though). This is a great defense against applications that attempts to brute for the firewall user/pass. Increasing the time the user is locked out can be a good idea to keep the bad guys from knocking, but could also really put a damper in your day if you lock yourself out for X amount of time.
But the commands to lower or increase it are the same in both firmware’s:
config sys global
set admin-lockout-duration X (seconds)
end
To increase the threshold (how many incorrect login attempts you can have)
config sys global
set admin-lockout-threshold (1-10 attempts)
end
Only allow logins from Trusted hosts
Why allow logins from anywhere on the internet, when you know if you logged in it would come from only a few sources.
5.4
Under the administrators options, you can select the trusted hosts (IP networks) that can login with the Mirazon account in this case. You could also modify the default admin account.

5.2

Change default port numbers used for logins
I was in a debate one time about the security of changing default port numbers, and a friend said “Changing your login port numbers is as secure as hiding your keys under the front door mat.” He was most certainly correct, but security by obscurity is better than nothing. By changing the default port numbers from 443,80 some bots that try to log in will not find the open login due to different ports that are not in its scanning script.
In the following examples I am changing the default port of 443 to 8081.
5.4
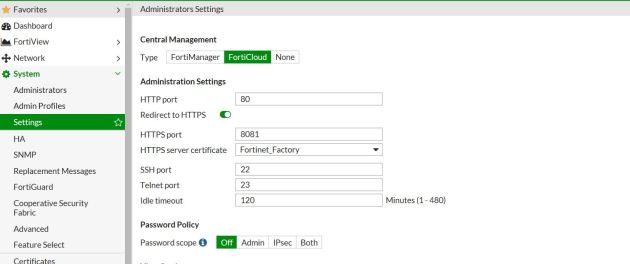
5.2

Summary
In summary there are tons of things to do to increase device security. One of the most important, if you don’t need to allow remote logins to the device, why even enable it? Disable the login options under the interface. I believe the best practice is to have an out of band management PC that might connect directly into the MGMT port. To access the FW you have to access this machine.
Changing Port numbers and implementing the other options are great ways to help reduce login failure attempts, or unauthorized access. Another great option, not explained here is using dual factor authentication. By default you get two licenses for two factor – why not use it for admin access!
The importance of logging is one thing that cannot be underestimated. When logging is enabled you know exactly what happened – if someone tried to log in, from where, what username, and if they failed or were successful.
These were just a few of the many ways to increase device security.
Link to login banner blog: https://www.mirazon.com/how-to-implement-a-fortigate-login-banner/

