Fortigate supports many HA options. They have a great active/passive HA option, as well as Active/Active. VRRP is another option that is supported. VRRP (Virtual Routing Redundancy Protocol) is a open standards protocol that helps eliminates the single point of failure for a network by allowing another device to take over routing automatically.
Basically one router is the Master (active), the other is a Backup (passive), the selection of which device is active or passive is based priorities of each device, highest priority (1-255) is the most preferable. The priority of 100 is default, and 255 the best. There is a heartbeat which is just a Multicast packet, that goes across a link that both devices use (normal lan link is fine). If for some reason that heartbeat is lost , then the backup router will take over as the master.
VRRP is a great way to make sure that if one router fails the passive router will become active and take over routing for the network. VRRP creates a virtual mac address that is shared between the two devices, the active device answers for the virtual mac and takes control of the Virtual IP that is also shared between the two.
You can use VRRP to load balance traffic as well. Load balancing is achieved by using to different VRRP groups, and balancing which router is primary for what group. The below image should help clarify what I mean.
You can use those two VRRP groups as primary and secondary’s for the default gateway in different vlans. So in this case, you could have Vlan 10’s default gateway on Fortigate A, and Vlan 20’s on Fortigate B, therefore having fail-over for both, but splitting up the load. This might be a great thing to do if you have a HA cluster of 60C’s, and they just cant handle the full traffic load in a HA scenario. Remember. each config is different on these firewalls, there is no config sync. There is an option to sync sessions between the firewalls, so that if one firewall were to fail, things would pick right back up and not have to establish the sessions again.
Things to note in this config – There is already an IP address assigned to the Vlan interface for management when when the VRRP address might not be active. I am also using the Preempt option to make sure Active is always Active if its online. The Physical interface the Vlans are configured on are trunks on both links going to Fort-A, and Fort-B.
Config time:
The config for VRRP is interface based, and CLI only.
Fortigate A:
config system interface
edit vlan-10
config vrrp edit 10 set vrip 10.10.10.1 set priority 255 set status enable set preempt enable end set vrrp-virtual-mac enable next
edit Vlan-20 config vrrp edit 20 set vrip 10.10.20.1 set priority 100 set status enable end set vrrp-virtual-mac enable end
Fortigate B:
config system interface
edit vlan-10
config vrrp edit 10 set vrip 10.10.10.1 set priority 100 set status enable end set vrrp-virtual-mac enable next
edit Vlan-20 config vrrp edit 20 set vrip 10.10.20.1 set priority 255 set status enable set preempt enable end set vrrp-virtual-mac enable end
This config will do exactly what we want, create a Virtual IP that is shared, and make sure the configured active (priority) unit takes back over the role of active if it goes offline and comes back online (preempt),
Fortinet like all vendors supports BGP and has many ways to configure it. In this case almost all settings are configured VIA the CLI. In this post I will show how to configure the Local preference attribute to influence what routes a device will take to leave the network. For example, if you have two ISPs, and we use one for primary, and the second for a backup then we would want to change the local preference to make ISP 1 more a better choice.
Changing the local preference of routes from the default 100, to a higher value makes those routes the best choice when leaving the network. Also you can use a prefix-list to change just the preference of one or more routes, you do not have to do all routes advertised by the neighbor.
Steps needed are:
– Get BGP instance configured
– Configure neighbors
– Create route map
– assign preference in Route map
– Apply route map to neighbor
– Clear BGP routes, and check new preferences.
After you get BGP configured VIA CLI or GUI we can start with creating the route map.
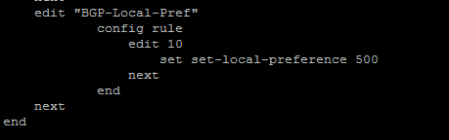
You can name the Route map whatever you like, for example if you have two ISPs, you might say ISP-1-Local-Pref. Then modify the rule you want, and change the local preference. Remember the higher the local preference the more preferred.
Command:
config router route-map
edit name
config rule
edit 10
set local-preference X
end
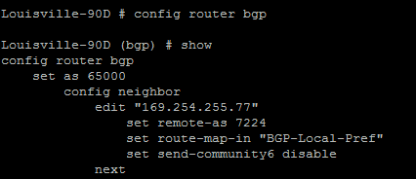
Next we can apply the route-map to the neighbor we want to set preference on.
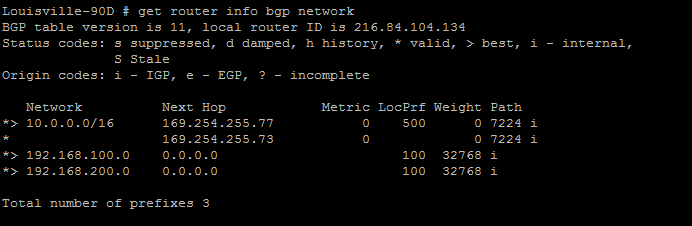
Once that is configured, we can check the perfernce of the routes with the command:
get router info bgp networks
You might notice that the preference has not changed. This is because we will need to clear the routes first. We can do this with a few different commands:
exe router clear bgp ip x.x.x.x out
This will clear all routes from this neighbor. If this is a live production network, it would be better to run the command:
exe router clear bgp ip x.x.x.x soft out
A soft reset uses stored prefix information to reconfigure and activate BGP routing tables without tearing down existing peering sessions. Soft reconfiguration uses stored update information, at the cost of additional memory for storing the updates, to allow you to apply new BGP policy without disrupting the network. Soft reconfiguration can be configured for inbound or outbound sessions.
Thats it! now we should see the new preference associated with our routes:
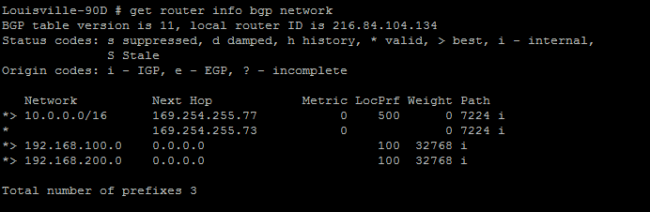
Notice the 500 instead of the default of 100. Everything is working, now all my routes going to the 10.0.0.0/16 network will take the 169.254.255.77 neighbor. Also notice the > symbol. This means it is the best route, and therefore the one put into the routing table. Other routes will not show up in the GUI routing table.
Recent Comments