Category Archives: Ruckus

Ruckus ICX switching – Displaying files on USB or flash

I needed to update the firmware on a Ruckus ICX 7150, but could not remember the file name of the firmware I was updating. I looked through the commands for a dir: flash, or dir:usb and really couldn’t find much. After some googling didn’t come up with anything either.

To display the the files use the “Show files {Device}” for example to show files on flash “show files flash”

ICX7150-24P Switch#show files?
ASCII string dir name


ICX7150-24P Switch#show files flash

Type Size Name

F 33554432 primary
F 32539748 secondary
F 256 primary.sig
F 162204 poe-fw
F 1576 $$ssh8rsahost.key
F 256 secondary.sig

66258472 bytes 6 File(s) in FI root

1135529984 bytes free in FI root

Below show getting the files on the USB drive.

ICX7150-24P Switch#show files disk0
F 60783027 SPR08095dufi.bin
D 4096 [—-] disk0/System Volume Information

60783027 bytes 1 File(s) in disk0

Finding Transceiver info in Ruckus ICX switches

I needed to find out what type of Optic was installed into a switch, and if it read up correctly. In most vendors its “show interface transceivers” or some other command. I struggled to find Ruckus’s – so I thought I would share.

To find the media type of the port – just use the “Show media” command – so easy!

For instance, I need to find out what type SFP is on eth 1/2/8, and if it read correctly. Check out the below:

Then, if I just want to check what all ports are: “Show media” by itself. Notice ports 1/2/1 and 1/2/3 are my stack ports – and I have DACs (twinax) in these ports.

Ruckus ICX integration with Fortinac

This entry shows how I have been setting up ICX switches with Fortinac.

In this scenario my Fortinac is located at 192.168.226.248, the switch is 192.168.226.53, and my SNMP community is “snmp”. I know very secure. The switch I am working with is a Ruckus 7250 running SPR08092a.bin

These are the settings that I am putting into my switch:

logging host 192.168.226.248
snmp-server host 192.168.226.248 version v2c snmp

snmp-server enable traps mac-notification
snmp-server enable traps link-up
snmp-server enable traps link-down

On the NAC we have to add the switch, and make sure we have a CLI user account, and SNMP creds that work. We can test this within NAC to make sure things are up and going.

1

After we add the device, we can validate the settings

validate

After the device has been added you should see your interfaces/devices/status all show up.


Ruckus ICX VLAN range command

Thought this might be useful for anyone who needs to make a lot of changes quickly to many vlans. In ICX vlans, and vlan interfaces (routing interfaces) are different. In this example I will show how to quickly edit each vlan in a range and modify STP settings.

Sacred-CORE#show vlan brief

System-max vlan Params: Max(4095) Default(1024) Current(1024)
Default vlan Id :999
Total Number of Vlan Configured :29
VLANs Configured :2 32 50 to 51 128 132 136 138 140 142 144 146 150 152 154 156 160 162 164 220 224 240 250 255 324 332 350 500 999

As you can see we have a lot of Vlans, so lets modify the STP settings for all of them. I will just copy the vlans listed above and basically paste them in since I want to modify all vlans.

Sacred-CORE#config t
Sacred-CORE(config)#vlan 2 32 50 to 51 128 132 136 138 140 142 144 146 150 152 154 156 160 162 164 220 224 240 250 255 324 332 350 500
Sacred-CORE(config-mvlan-2*500)#spanning-tree 802-1w

Sacred-CORE(config-mvlan-2*500)#spanning-tree 802-1w priority 4096

Sacred-CORE(config-mvlan-2*500)#

Bam! now we have modifed the setting for all vlans. The syntax of the command is

vlan X X X X – so lets do vlan 2, 128 and 136

vlan 2 128 136   — thats it.


Ruckus ICX 7250 VRF setup/config

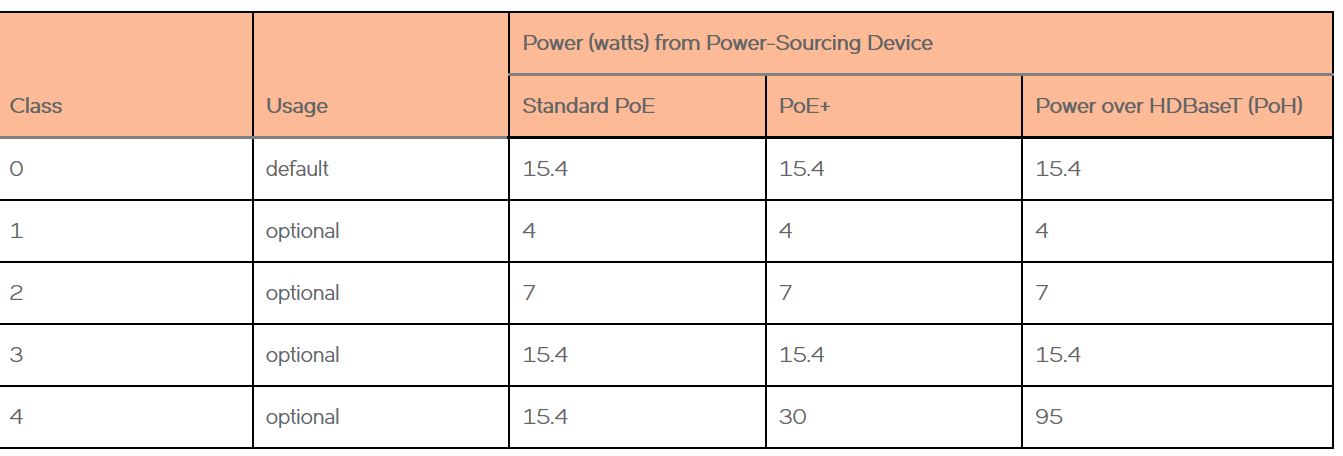
This entry details the config for setting up and deploying VRFs on a Ruckus ICX 7250. Recently I had an issue where a client had a new ISP and that ISP gave them the Customer WAN /30 subnet, then routed their Customer LAN subnet (Public usable addresses) to their side of the /30.  The customer did not want any extra equipment installed like a router to handle the WAN routing, so the next best thing was to split the Ruckus 7250 switch into a WAN/LAN router – One switch to rule them all! The VRF feature is in Ruckus’s Layer 3 Premium feature set so a license will be needed. In this scenario the 7250 is the local gateway for all Vlans – so local LAN routing, and the Internet router.

Of course there are a lot of problems with the following design, like single point of failure, but its a small site, with 1 48 port switch, Fortigate firewall and cloud Voip SD-WAN router. The purpose of this design is to allow the Voip SD-WAN solution to be outside the firewall, so using the 7250 for both LAN/WAN routing really and it worked well. If the ISP would have not required a customer routing device we would have just setup a Internet-Vlan, set Fortigate/INSpeed to public IPs, and placed them in that vlan. But, the ISP is requiring a routing device in this instance.

Here is the design.

vrf-icx

Config:

I think the ICX series supported VRFs when it was running Brocade firmware, but I would recommend upgrading to Ruckus’s ICX firmware – Version number SPR08080 or greater. Of course the device has to be running the Routing firmware not the switching code. The VRF feature is in Ruckus’s Layer 3 Premium feature set so a license will be needed.

First lets enable the VRF, and increase the amount of routes.

system-max ip-route-default-vrf 9000
system-max ip-route-vrf 500
system-max ip6-route-vrf 500

These commands will  enable the VRF functionality and it will need you to reboot.

Next we can start configuring our VRF. In this case my /30 will be 1.1.1.0/29 – so .1 will be the ISP, .2 will be us. I will setup the routes for the VRF, and then the Vlan interface and apply the /30. There is a keyword in the VE config to make sure its associated to a given VRF. Within the VRF config you need to specifcy the Route Identifier – only matters locally.

vrf INTERNET-VRF
rd 11:11
ip router-id 12.5.110.2
address-family ipv4
ip route 0.0.0.0/0 12.5.110.1
exit-address-family
exit-vrf

vlan 300 name INTERNET-VRF by port  — My WAN Vlan for Fortigate WAN and SD-WAN router WAN interface. The Customer LAN Subnet goes here.
untagged ethe 1/1/19 ethe 2/1/23
router-interface ve 300
spanning-tree 802-1w
spanning-tree 802-1w priority 4094
!
vlan 400 name ISP-VRF by port — /30 ISP network
untagged ethe 1/1/24
router-interface ve 400
!

interface ve 400
vrf forwarding  ISP-VRF – This is the command to associate the VE to the VRF
ip address 12.5.110.2/30

interface ve 300
vrf forwarding INTERNET-VRF – This is the command to associate the VE to the VRF
ip address 1.1.1.2/29

Here is a subset of my user config – Vlan 40 – this is where most of the desktops go, and the gateway in this case 10.6.40.1/24 lives on the switch, on the default VRF.

vlan 40 name Computers by port
untagged ethe 1/1/1 to 1/1/18 ethe 1/1/21 ethe 2/1/1 to 2/1/18 ethe 2/1/22
router-interface ve 40
spanning-tree 802-1w
spanning-tree 802-1w priority 4094
!
!
show run int ve 40
interface ve 40
ip address 10.6.40.1 255.255.252.0
ip helper-address 1 10.6.10.10

Thats it! A show IP route of the default VRF (Switching VRF) shows:

#show ip route
Total number of IP routes: 9
Type Codes – B:BGP D:Connected O:OSPF R:RIP S:Static; Cost – Dist/Metric
BGP Codes – i:iBGP e:eBGP
OSPF Codes – i:Inter Area 1:External Type 1 2:External Type 2
Destination Gateway Port Cost Type Upti me
1 0.0.0.0/0 10.6.254.2 ve 254 1/1 S 1d17 h — This is the Fortigate
2 10.6.0.0/22 DIRECT ve 1 0/0 D 1d17 h
3 10.6.10.0/24 DIRECT ve 10 0/0 D 21h4 m
4 10.6.40.0/22 DIRECT ve 40 0/0 D 1d17 h
5 10.6.100.0/24 DIRECT ve 100 0/0 D 1d18 h
6 10.6.254.0/24 DIRECT ve 254 0/0 D 1d17 h
7 172.16.6.0/29 DIRECT ve 650 0/0 D 1m5s
8 192.168.6.0/24 DIRECT ve 1 0/0 D 1d17 h
9 192.168.100.0/24 172.16.6.1 ve 650 1/1 S 1m4s

But, if we specifcally show the Internet-VRF routes:

#show ip route vrf INTERNET-VRF
Total number of IP routes: 3
Type Codes – B:BGP D:Connected O:OSPF R:RIP S:Static; Cost – Dist/Metric
BGP Codes – i:iBGP e:eBGP
OSPF Codes – i:Inter Area 1:External Type 1 2:External Type 2
Destination Gateway Port Cost Type Uptime
1 0.0.0.0/0 12.116.193.1 ve 400 1/1 S 21h4m
2 12.5.110.0/30 DIRECT ve 300 0/0 D 20h57m
3 1.1.1.0/29 DIRECT ve 400 0/0 D 21h5m

And there we have it, the devices is now in two VRFs, a default and INTERNET-VRF with specific interfaces assigned to it. If you want to test pinging from that VRF specifically you can use the following commands:

#ping vrf INTERNET-VRF 8.8.8.8
Sending 1, 16-byte ICMP Echo to 8.8.8.8, timeout 5000 msec, TTL 64
Type Control-c to abort
Reply from 8.8.8.8 : bytes=16 time=1ms TTL=122
Success rate is 100 percent (1/1), round-trip min/avg/max=1/1/1 ms.

Ruckus ICX 7250 and Mitel 6000 Headset Power issues

Currently I am working with a client who has lots of Ruckus ICX 7250 PoE+ switches. These have been great switches, lots of features such as: large PoE budget, 10G, VRF/Routing capability. Recently the client has rolled out Mitel headsets that charge from their larger handset phone stations.

Strange issue has been happening though, when they put the headset in to charge the phone reboots, and the switch throws an error (you will see below) and basically kills power to the port, thus everything reboots. After some quick analysis it seems like the phone station is requesting 802.11AF (15.4 watts max) and then when the headset gets turned on to charge it spikes above 15.4 watts for a bit, and making the switch rightly throw the error. The phone pulls somewhere around 1-3 Watts, and the headset seems to add an additional 3 (according to its documentation). Still well within range of 802.11AF.

Link to Mitel headset: https://www.mitel.com/en-us/products/devices-accessories/ip-phones-peripherals/other/integrated-dect-headset

This is an assumption, I might go through and do some debugging and see if that’s the exact issue, but adding some commands to the switch did fix the problem. So before we go through commands and analysis; the commands used to resolve the issue basically set each port to 802.11AT which allocates 30 Watts for the port. An issue with this: simple math indicates that if we have a 48 port switch with a 740 Watt PoE budget, we can only really give each port 15 watts if every port is powered up. That’s true, but luckily we aren’t going to run into that problem here. Few headsets/Power needing ports.

When the headsets were plugged in the switch started throwing these errors:

Dec 20 19:41:27:C:System: PoE: Power disabled on port 1/1/19 because of PD overload.

This would then disable PoE on the port for a few seconds and make the phone reboot.

When checking to see how much power the phone was pulling the following was done prior to the fix commands – Please just look at Port 19:

Poe-Before-Commands

The phone was showing up just asking for 3.6 Watts and it was only allocating 15.4.

Lots  of ways to tackle the fix to this problem, the approach I used is to modify the allocated power by class – So instead of letting the switch decide how much power to allocate by letting the device tell it – I am forcing the switch to change the power class for the phones (in this case 3 ) to 4. This allocates a default of 30 Watts. Below is Ruckus’s outline for the Power classes

Powr-class

The commands to modify this:

interface ethernet 1/1/19
inline power power-by-class 4

After applying these commands check Port 19 out:

Poe-2

All devices are still requesting pretty much the same amount of power they were before except now we see the headsets requesting power as well. Not only that but each port does have 30 Watts allocated to it. So the thought that we could run out of allocated power if we had a lot of phones/PoE devices plugged in is a real concern. Right now, even though we are only using 47.7 Watts, the switch has provisioned 390.

There are better commands to use other than the power-by-class that I used. For example, since we know the phone with charging the headset only needs little over 4 Watts we could use the command “inline power power-limit 25000” to allocate 25 Watts instead of the full 30. This number could keep being modified to find the exact number where the port drops. Or you could just modify the ports with headsets only – But, like I mentioned above we have no real need to do that, so the power-by-class blanket command works fine in this case.

After applying the above command check out port 19’s PoE allocation:

Poe-after-limit

Lots of ways to fix this issue, but all modify the amount of power allocated to the port.


Ruckus ICX Radius logins

I refer back to these commands a lot and thought they might help someone else. This will allow the Ruckus or Brocade ICX switches to authenticate to a radius server for logins to the device.

aaa authentication web-server default radius local enable
aaa authentication login default radius local enable
aaa authentication login privilege-mode

radius-server host 1.1.1.1 auth-port 1812 acct-port 1813 default key $aWdAblUmc3JuVSY9Z1k= dot1x

A few things to note about this. I am setting the web-server login and SSH logins to use radius, then if radius is not available use local authentication settings.

The login privilege-mode command bypasses the enable password and logs be straight in a privileged.

Ruckus ICX untagged vlan port config

I have been working with Brocade ICX and now Ruckus ICX for a few years now. They are awesome switches.

I was asked a couple of times about something that was happening when someone would try and set the untagged or access vlan on a port. They would get this error:

error – port ethe x/x/x are not member of default vlan

The reason we were getting this error is because other vlans were attached to port as either untagged or tagged. To put a port into a vlan other than default as ‘untagged’ we need to make sure no other vlans are bound to that port. To do this we can check what vlans are attached to the port. In this scenario my default vlan is 999. It would be 1 on a switch that it was not manually changed on.

switch#show vlan br eth 1/1/3

Port 1/1/3 is a member of 2 VLANs

VLANs 32 48

Untagged VLAN : 999

Tagged VLANs : 32 48

Great, so now we know its untagged 999 (default) but tagged those 2 other ports. We need to remove the tags of 32 and 48 on this port before we can add it untagged into vlan 16 – which is the goal

switch#config t

switch(config)#vlan 32

switch(config-vlan-32)#no tag eth 1/1/3

switch(config-vlan-32)#vlan 48

switch(config-vlan-48)#no tag eth 1/1/3

Voice-vlan is cleared on port 1/1/3

switch(config-vlan-48)#

switch(config-vlan-48)#exit
switch(config)#vlan 16

switch(config-vlan-16)#unt eth 1/1/3

Added untagged port(s) ethe 1/1/3 to port-vlan 16.

switch(config-vlan-16)#exit

switch(config)#exit

switch#show vlan br eth 1/1/3

Port 1/1/3 is a member of 1 VLANs

VLANs 16

Untagged VLAN : 16

Tagged VLANs :


Thats it! now we are untagged or access in vlan 16. But wait! what if we wanted to have it be a trunk port to allow vlans 32/48 and be native 16. Then we would use the ‘Dual port’ command with the modification of the untagged vlan like this:

dual mode 16   — means untagged 16, but allow whatever vlans are tagged to pass. Of course vlans 16,32,48 would need to be tagged on the port first. I will write another entry about that.

Ruckus Zonedirector LDAP setup

Within ZD we might need to enable LDAP look ups to facilitate in using Active Directory logins to the firewall for administration, or authentication for Guest pass creation/ZeroIT.

Recently I had to do this, and it had been a while, so I decided to write a short entry on it.

So in this case I am configuring LDAP for use with Guest pass so domain users have to sponsor guest wireless accounts.

Below shows the options for our Test-AD LDAP server. There are some key things here.

Notice in this case we are not using TLS.

The Base DN and admin DN are the location of the user who can perform lookups in AD. The best way to find this info is going to AD user/computers and under “View” enable “Advanced features” then go into the details of the user account- you will have a “attribute editor” tab. The User DN is located, if you double click that attribute you can copy it directly.

Next key attribute is “sAMAccountName” under key attribute – that attribute is really just the windows user login account name.

ldap1

That’s it! I will do another entry on setting up guest pass where domain users can sponsor accounts.

Enabling LLDP in Ruckus wireless

Ruckus has finally built in the ability to use LLDP to find Access points. I was so excited when I found this out, I installed the newest firmware and was ready to be blown away – and alas.. no LLDP. So, what was wrong? LLDP is not enabled by default! You have to go into the AP group via CLI and enable LLDP. No biggie.

This feature comes in software version ZDXXX 9.9.0.0.205 GA Software Release .

To enable LLDP – SSH into the zonedirector

Then after logging in run these commands

enable

config

ap-group “System Default”

LLDP enable

exit

exit

Here are some screenshots:

LLDP-3

As you can see, by just doing a “Show” it is disabled:

LLDP-1

After running the command: “LLDP enable”

LLDP-2

And BAM: now I can find my APs no matter where they are plugged in at

LLDP-5-edit