Tag Archives: Fortigate
Fortigate SSL VPN Password expiration notification
The Fortigate SSL is an amazing feature, but when users do not log in that often to any internal resources their AD password may expire and the user will not know. What really stinks is if that user has to post data for the month, and logs in at midnight for an 8 a.m. deadline! Luckily Fortigate has the ability to push the LDAP password expiration notification to the user, and can even let them change the password through SSL VPN login.
Steps:
– Get SSL VPN up and going with LDAP Authentication – This has to be an LDAPS connection to change the password, and your account to query LDAP has to be a domain admin!!!
– In CLI modify the LDAP server to allow password expiration notification, and change.
First create or modify your LDAP server in the GUI, and make sure its set to use LDAPS. The image below should be a good guide. Remember, the service account you use to query LDAP does not have to be an admin account, but if you want to change passwords then it does have to be a Domain-Admin. A good idea is to always create a service account to use for the Fortinet to query LDAP. That way if your admin password changes it will not affect this this account.
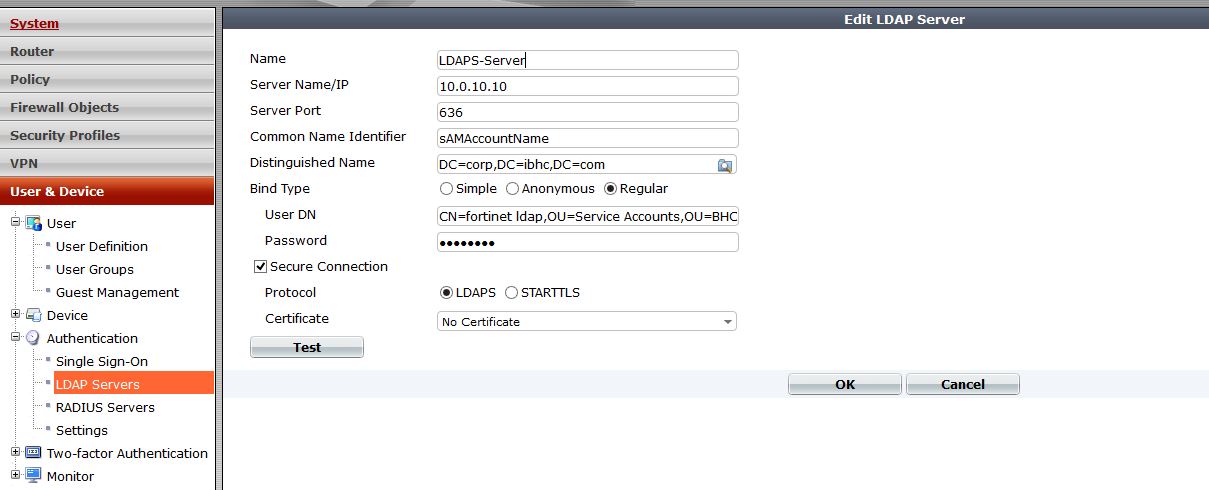
After that is configured, and tests/querys successfully then lets drop down to CLI and get the following configured.
Config user ldap
edit “Server name”
set password-expiry-warning enable
set password-renewal enable
end
For a look at all the options see picture below:

And that’s it, after this LDAP will push those messages to the client when they log in.
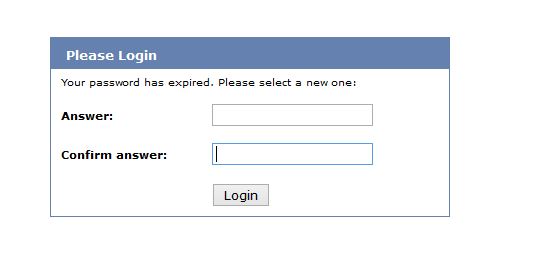
Remember, that the LDAP connection has to use SSL (LDAPS) to change the password.
Fortigate BGP AS Path prepending
Docs.fortinet.com is always the best place to get any Fortinet info.
Fortinet like most firewall vendors supports almost all Dynamic routing protocols. BGP is one, the GUI has simple to setup BGP options, but many do not exist in CLI, which might be for the best. In this post I will show how to create a Route-map and prepend the AS path influence ISP/neighbor routing.
First lets talk about why you would want to prepend an AS path. You would want to do this to influence how neighbors get to your routes. For example, if you had two ISPs, or neighbors and wanted to broadcast your routes to both neighbors, but wanted everyone to take neighbor 1 to get to your router, with a backup of Neighbor 2 you could prepend the AS path and make this happen.
BGP is a very deep protocol and there are many different ways to influence routing. Routers will always take the shortest AS path to get to its destination so that is the preferred method for this.
Steps:
– Add BGP neighbors/networks – you can do this in GUI
– In CLI create route-map and use the commands to prepend YOUR AS path
– Assign Route-map to neighbor
– Clear BGP routes.
Create BGP in GUI.
This includes our AS number, the Neighbors and their AS numbers, and our networks we are advertising.

Route-map Creation
Lets then drop to CLI and create our Route-map

Commands:
config router route-map
config “Name” —- create route map
edit rule X — from there you can set your Prepend
set set-aspath “x x x “
set action permit — I did not add this in the image. Routes will be blocked if this is not added.
end
Assigning Route-map
Now lets assign the route map to our neighbor. Since we are wanting to control how routing will get to us, we will apply this route map to outgoing routes.

the command “set route-map-out” is what sets the route map on the outbound routes.
Last but not least, lets clear the IP routes so our prepend takes effect. You can do this through the command:
exe router clear bgp ip x.x.x.x out
This will clear all routes from this neighbor. If this is a live production network, it would be better to run the command:
exe router clear bgp ip x.x.x.x soft out
A soft reset uses stored prefix information to reconfigure and activate BGP routing tables without tearing down existing peering sessions. Soft reconfiguration uses stored update information, at the cost of additional memory for storing the updates, to allow you to apply new BGP policy without disrupting the network. Soft reconfiguration can be configured for inbound or outbound sessions.
Status
So now we need to take a look at the routes we are sending out to see if our AS has actually be altered. After resetting the peer it might take a minute or two before this shows up correctly.

The command is:
get router info bgp neighbors x.x.x.x advertised-routes
That’s it!
Now we are controlling how devices will get to our networks in a Dual homed situation (two connections to ISPs). The querying devices will always take the lower AS path to get to its destination.
Login to the Fortigate firewall with Active Directory accounts
Logging into the firewall with Active directory accounts can be a great thing. You can base login privileges on A.D. security groups, and track what the users do. For example if you had help desk users and only wanted them to only have read access, no problem. Also, what if you wanted to audit what a user does on the firewall, no problem. You can do this through a mix of Logins and admin profiles.
There are a few things we need to do, create the LDAP connection, create our security groups in A.D. to match in the firewall, create the user group in the FW and assign it the correct admin profiles.
1. Create the LDAP connection
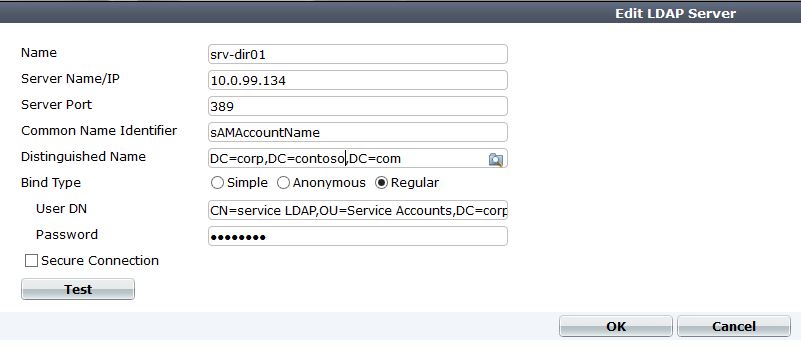
You do not have to be a super user to query the LDAP account, I would just create a Fortinet service account, and use that to query with.
2. Create AD security groups. If you want domain admins to log in, great just match it in the firewall. If you have help desk users that you want to have restricted privilege than you would have to create that in A.D. and add the needed members.
3. Create local firewall groups that match the LDAP groups.

Here we create a “Firewall” Group, and add our remote server to the list. If you notice you can query LDAP from here, and select the group you want by clicking on the folder to the left side of the group name.
4. Add the group as a admin that can login
Under system – admin – administrators add a new admin.

Create the name you want, and select the group we just created. Then select the admin profile we want. This is for admins, so they will be super admins when they log in. If you wanted a custom profile, lets say restart the device, but that’s it then we can create that, then add it. There are more options here such as using Forti-token, and email.
Notice that the wildcard option is checked – A wildcard admin account is an administrator account with the wildcard option enabled. This option allows multiple different remote administration accounts to match one local administration account, avoiding the need to set up individual admin accounts on the FortiGate unit. Instead multiple LDAP admin accounts will all be able to use one FortiGate admin account.
5. Create a different admin profile for privileges.
In this example I will create a help desk account, that can only configure system settings (IP address, etc). Otherwise everything is read only.

After saving this, you can go back and add it to the admin group.
Pushing DNS Suffix to Fortigate SSL VPN
After setting up a SSL VPN tunnel, one of the biggest complaints I get is “I cannot get to my shares”. This is because the Domain suffix has not been pushed out to their tunnel interface. This is easy to remedy, but seems to be in CLI only.
Within cli you have many options under the ssl vpn config that are not presented in the GUI.
You can edit the VPN tunnel with the command:
config vpn ssl settings
Here are a list of all the settings:

as you can see, the dns-suffix is an option, as well as DNS servers.
The Suffix option is not presented in the GUI, but the dns servers are.
The command to set the suffix is:
set dns-suffix corp.local
end
Make sure your DNS servers are also set for your internal network and it should now work without a problem.
Fortigate Fortios 5.0 SSL VPN Configuration
The best information available for anything fortinet is always found at docs.fortinet.com. This entry will show the needed steps to create a SSL VPN via the web interface.
Creating the SSL VPN has many working parts that come together to make one of the best Remote access VPNs out there. In this example we are creating a Split tunnel VPN, and enabling Tunnel mode.
The SSL VPN is one of the best features of the device, it has an open license, so you can have as many people connect as the device hardware supports. No crazy licensing for SSL VPN as with Cisco and Sonicwall. You can also utilize the VPN to get select information to users based on their AD security group. For example if you have a business with users traveling all the time, you might have a certain portal for one group of users and have their internal bookmarks and file shares, and completely different portal for office staff users. Another great benifit is in the protocol itself, SSL is almost never blocked by outbound firewall policies. A lot of companies (hotels, hospitals) and educational institutions block IPSEC from leaving the network which stops your remote access VPN from connecting.
Steps:
1. Create Address object for SSL Subnet and Internal networks
2. Create route for new subnet
3. Create Users/User group for user authentication
4. Config the VPN Portal
5. Config the VPN settings
6. Create the SSL VPN policy, including the projected subnet for Split Tunnel.
7. Create policy to allow traffic from the Lan to SSL, and from SSL to Lan.
1. Create Address object for SSL Subnet and Internal networks
We will create an address object with the Subnet of our SSL VPN clients. I would recommend using a crazy private IP subnet as to not conflict with Home/work local subnets.
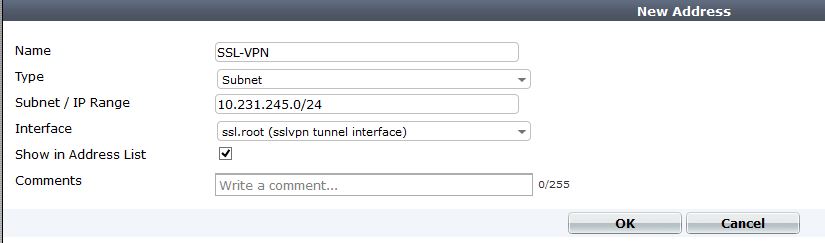
Then we need to create another object for our Protected subnet. This is our internal network that we want the remote user to be able to access. If there are multiple subnets it might be better to add an address object group.
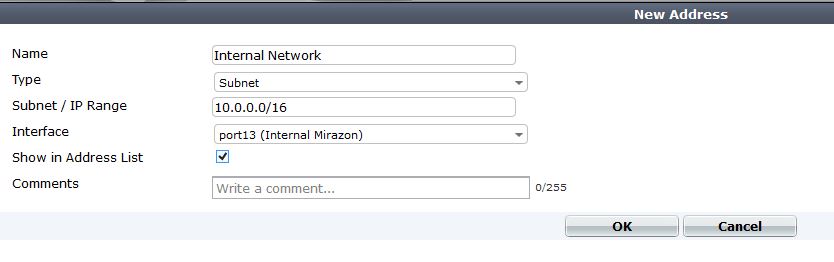
2. Create route for new VPN subnet
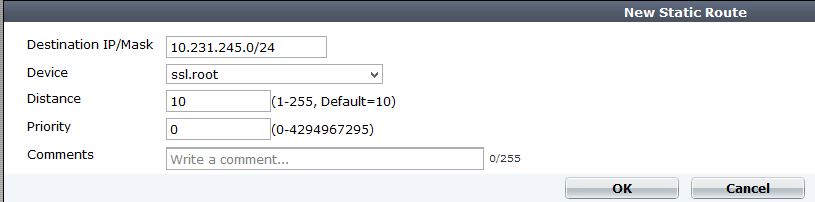
Since the SSL VPN is a “interface” we will route our subnet across of it. Notice our device is ssl.root, and that removes our needed gateway.
3. Create Users/User group for user authentication
There are many different ways to configure authentication within the device. You can authenticate VPN users against LDAP, Radius, or local accounts. In this example I am just using local accounts, but using LDAP or Radius is a much better option. You can use just individual users, or groups to authenticate to within the VPN policy. I would go ahead and create a User group so that you can add any local, radius, or ldap users into it in the future.
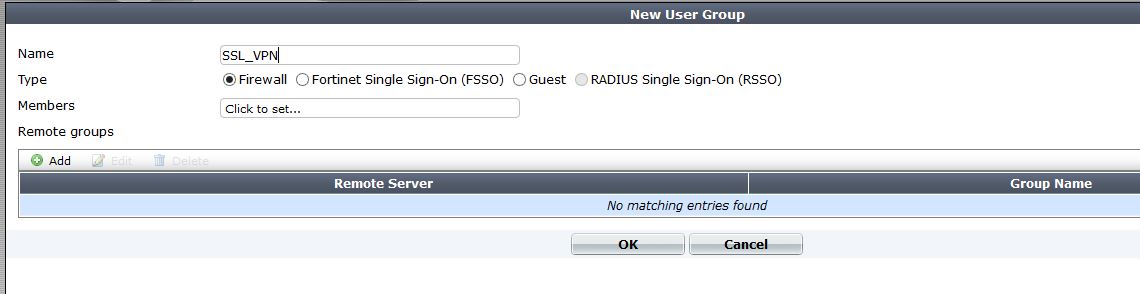
I am creating a user group call SSL_VPN and in this case its just local. If I wanted to add a LDAP/Radius server to authenticate against, I could just add the remote server. If I wanted to get even more specific and say authenticate against a security group within LDAP I would just modify the remote server portion of the user group to add that.
4. Config the VPN Portal
The portal is the landing page of the SSL VPN. It is a great place to add book marks, shortcuts for RDP, or info for users. For example, we have an internal sharepoint site for users, by placing a link on the portal, users they just have to click and Whola, instant access. This is great because installing the VPN client which allows tunnel mode requires admin access to the PC. If a user is traveling or at a hotel they might not have this access. Other great uses are RDP session, and file shares. Both will launch in a Java applet window and allow you access to RDP/SMB.
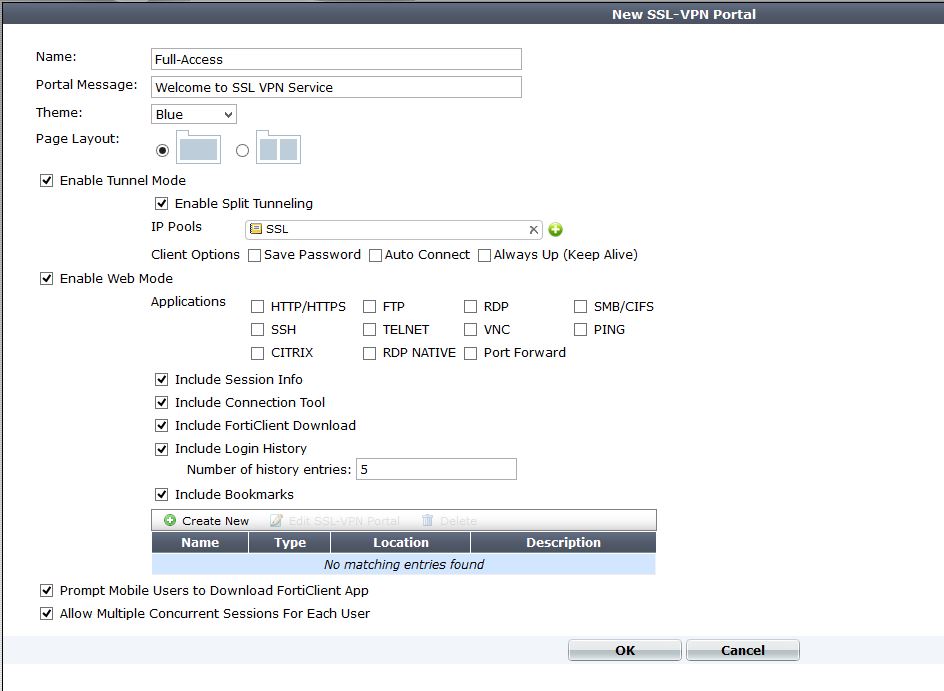
We are using the “Full-access” Portal, this is just a name. I added the IP Pool for the clients to get tunnel addresses. You can customize the page to any specification. A note, you can also fully edit your VPN login page to reflect your company logo, etc. You can do this by adding in the feature under system – admin- features and enabling it.
5. Config the VPN settings
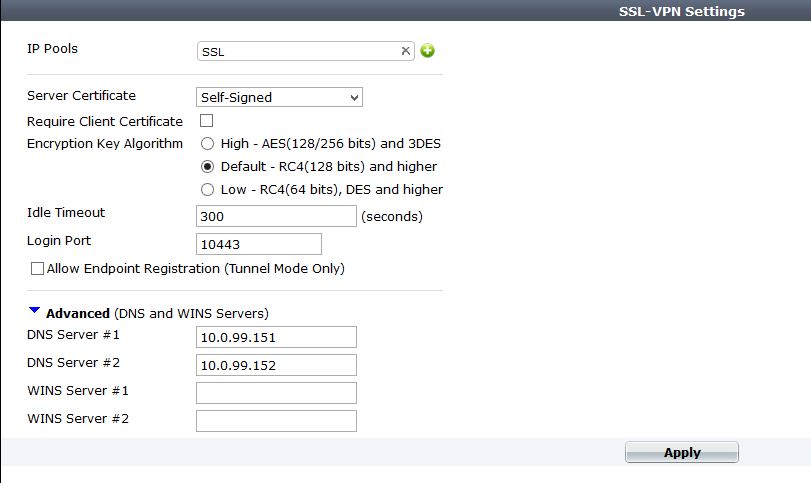
The VPN settings consists of the IP pool, Port used, encryption strength, and of course DNS/WINs servers. If you want to push your domain name so that DNS will resolve to this interface, its a CLI command. I will do another entry on it.
6. Create the SSL VPN policy, including the projected subnet for Split Tunnel.
This is where we actually allow access from the internet to our VPN portal. It is also where we specify our Protected subnets, which are the subnets injected into the clients routing table. You can also specify what portal certain users will see. For example, if you had a group of teachers who needed to get to the Teacher portal, and an admins group that needs to have a different portal and ACL to get to all servers.
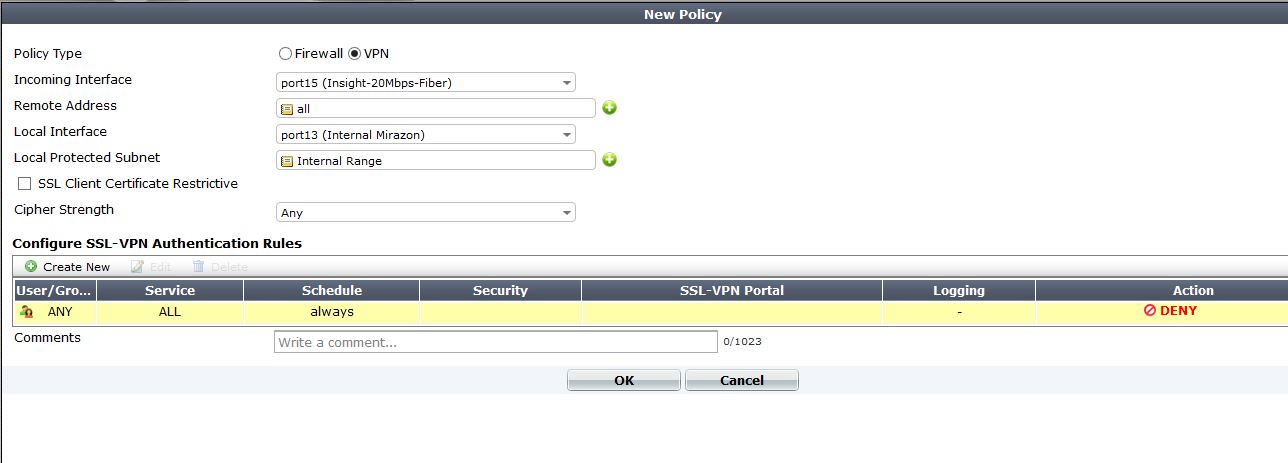
Notice we select VPN as type, then incoming interface. The Local protected subnets are what we are pushing into the routing table of our client.
Next create an new Authentication policy.

From here select your user group that we created earlier, if you want individual users select those as well. You can also enable UTM if you feel its needed.
Now just save all the settings
7. Create policy to allow traffic from the Lan to SSL, and from SSL to Lan.
For the last step we need to create policies to allow traffic in both directions. By default all traffic is blocked between interfaces int he firewall. The SSL VPN is an interface, so we need to allow traffic to it.
Just create a policy with Source interface being ssl.root, and allow all traffic to your LAN (or however you see is best to secure) and then another policy from LAN to ssl.root.
Thats it! There are some optional configs dealing with Certs on both sides, and much stronger encryption methods.
Notes*
If you have a MPLS, or DMZ interface where you need VPN clients to access you will have to create another VPN policy going from WAN to – DMZ, or WAN to MPLS and just mirror the WAN-to-lan SSL VPN policy. You will also have to modify the protected subnets with that interfaces network. If anyone has trouble with this feel comment and I will explain better.
On top of that you will need to create more ssl.root to DMZ and DMZ to ssl.root policies to allow access between the interfaces.

