Fortigate – How to create a default route with a dynamic connection.

Recently I needed to make sure select traffic would flow over a certain ISP link. Unfortunately that link had a dynamic address, which meant the address and gateway of that route could change anytime. Also I wanted to have my primary ISP failover to this link if needed.

To accomplish these things I needed to have both default routes in my routing table at the same time. This means that they both have the same distance, but different priorities. One way to accomplish this is to configure a static default route, and just change the priority of the link , but how can you do this when you do not know the gateway?

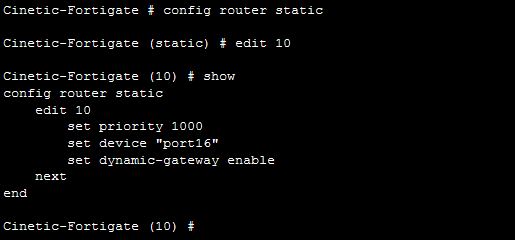
You can create a dynamic-gateway static route in the Fortigate.

dynamic-route

Through CLI you can create a dynamic gateway route using the above syntax.  Remember, the higher the priority the less preferable the route.

You can also create basically the same thing under the interface of the WAN link by using the distance, and priority interface commands listed below:

cin-interface

So now if we check our route monitor:

cin-routes

We have both default routes, and can successfully use a policy based route to push the needed traffic out.

How to get Fortigate interface statistics such as errors/discards

There are two really good ways to pull errors/discards and speed/duplex status on FGT. One method is running the CLI command:

diag hardware deviceinfo nic X – Where X would be the port, for example wan1

Results:

Glass-B # dia hardware deviceinfo nic wan1
Description :FortiASIC NP6LITE Adapter
Driver Name :FortiASIC NP6LITE Driver
Board :100EF
lif id :2
lif oid :66
netdev oid :66
Current_HWaddr 00:09:0f:09:00:15
Permanent_HWaddr 70:4c:a5:1c:97:ee

========== Link Status ==========

Admin :up
netdev status :up
autonego_setting:1
link_setting :1
speed_setting :10
duplex_setting :0
Speed :1000
Duplex :Full
link_status :Up

============ Counters ===========

Rx Pkts :10168446
Rx Bytes :11555061952
Tx Pkts :7135911
Tx Bytes :1372048635
Host Rx Pkts :9869349
Host Rx Bytes :11069429016
Host Tx Pkts :6928881
Host Tx Bytes :1304248922
Host Tx dropped :0

On 1500D’s and other large devices the command is a little different. See the bottom.

on 1500D’s it seems the command changes a little bit to : “diag hardware nic port40“— this was the results from a 1500D that is running 10 gig. The output is at the bottom.

Second way

I started doing some research and found that there was a command that would drop you down to a very limited Linux shell. There are a few commands that are support such as “ifconfig”. This blew me away. I have been wondering if there was a command like this for a long time.

Log in through CLI, and run ” fnsysctl <command>” for example “fnsysctl ls”.

So to get the interface stats, I would just run: “fnsysctl ifconfig port16” or whatever port you want to look at.

fnsysctl

And there we go. I have search for some other ways to get this, and have not found anything. If someone finds something better please pass it along.


Output from 1500D

FGT# get hardware nic port40
Description :FortiASIC NP6 Adapter
Driver Name :FortiASIC Unified NPU Driver
Name :np6_1
PCI Slot :0000:0d:00.0
irq :40
Board :FGT1500D
SN :FG1K5D3I15800578
Major ID :3
Minor ID :0
lif id :19
lif oid :171
netdev oid :171
netdev flags :1303
Current_HWaddr 00:09:0f:09:00:24
Permanent_HWaddr 08:5b:0e:e3:45:1f
phy name :port40
bank_id :3
phy_addr :0x1f
lane :3
flags :804006
sw_port :8
sw_np_port :12
vid_phy[6] :[0x7f][0x29][0x00][0x00][0x00][0x00]
vid_fwd[6] :[0x7e][0x00][0x00][0x00][0x00][0x00]
oid_fwd[6] :[0xd9][0x00][0x00][0x00][0x00][0x00]
========== Link Status ==========
Admin :up
netdev status :up
autonego_setting:0
link_setting :1
link_speed :10000
link_duplex :1
Speed :10000
Duplex :Full
link_status :Up
rx_link_status :0
int_phy_link :0
local_fault :0
local_warning :0
remote_fault :0
============ Counters ===========
rx_error :0
rx_crc_error :0
rx_carrier :0
rx_oversize :0
rx_undersize :0
tx_collision :0
Rx Pkts :109497620
Rx Bytes :150634406914
Tx Pkts :74293345
Tx Bytes :42164760114
Host Rx Pkts :30734166
Host Rx Bytes :38611688664
Host Rx dropped :0
Host Tx Pkts :41309687
Host Tx Bytes :20219939267
Host Tx dropped :46
sw_rx_pkts :109497628
sw_rx_bytes :150634408123
sw_tx_pkts :74293361
sw_tx_bytes :42164761592
sw_rx_mc_pkts :301
sw_rx_bc_pkts :970
sw_in_drop_pkts :0
sw_out_drop_pkts:0
sw_np_rx_pkts :92470644
sw_np_rx_bytes :80482907648
sw_np_tx_pkts :143654631
sw_np_tx_bytes :183360431151
sw_np_rx_mc_pkts:136
sw_np_rx_bc_pkts:502
sw_np_in_drop_pkts:5708
sw_np_out_drop_pkts:0


Ruckus wireless – Stuck in provisioning

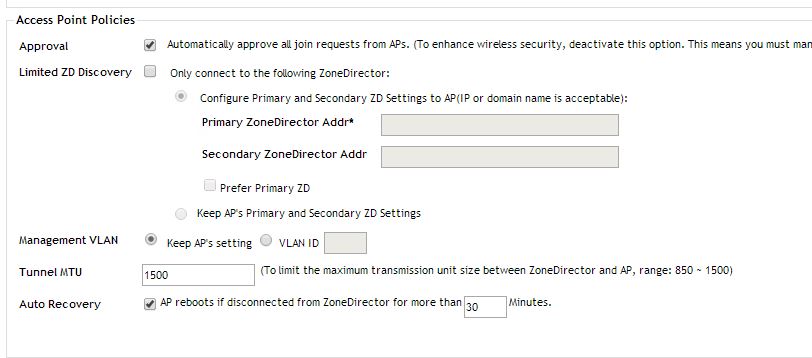
Sometimes when we deploy Ruckus APs remotley over a VPN, they will come up in the Zondirector but will stay on provisioning. then reboot after a bit, and then come back in as provisioning. The reason this happens is that the extra overhead of the added IPSEC header

The cause is the MTU on the Ruckus ZD. Sometime you will have to lower this due to the overhead added to the packet with the IPSEC tunnel.

To lower the MTU of the ZD (First step in troubleshooting APs across a VPN) is to go to configure – APs – and towards the bottom of the page you will see the MTU setting. I would lower this all the way for testing – Lower to 850 or 900. After lowing give the APs 5 minutes to show up in the ZD.

Capture

Vyatta out of space?

Today I had a vyatta that has limited HD space and could not  bring up VPN tunnels due to the lack of space. The below command is what I used to find the largest folder on the Vyatta file system :

find / -type f -size +20M -exec ls -lh {} \; 2> /dev/null | awk '{ print $NF ": " $5 }' | sort -nk 2,2

The command above searches the whole file system and reports back files larger than 20M.

I found that my wireshark folder had a lot of old captures. I navigated to the folder and removed all old captures and that freed up the missing space.

Cisco ASA Anyconnect Template 8.3+

Anyconnect along with webvpn is Cisco’s SSL VPN and portal. It works great.

This is my homegrown template for implementing the Anyconnect VPN. There are somethings to note with it. 1. You need to update your VPN client for the OS you need from Cisco. I know there were many issues with Windows 8, and they all seem to be fixed with the new client. 2. This Template works great on 8.3 and above. The steps are made to work with a pretty vanilla config. If you already have a bunch of config it might take some tweaking to work with your other settings.

I will paste the whole config at the bottom of the entry and you can just copy, rename things and paste in. So, lets review what is needed to get anyconnect up and working, and what these parts actually do.

If anyone has anything to contribute feel free to comment.

1. So, lets create the subnets we want for our VPN. I am choosing to use 10.253.241.0/24 for my “Anyconnect” profile. I like to use objects my networks because you can reference them throughout your config and its a great way to keep organized.
object network Anyconnect-Subnet
 subnet 10.253.241.0 255.255.255.0
object network Internal-Lan
 subnet 10.1.10.0 255.255.255.0

This created my Internal subnet, and Anyconnect Subnet.

2. Create a IP pool for your subnet (Remember, you can have multiple pools if you need to have multiple Groups/Portals)

.ip local pool Anyconnect-VPN-Pool 10.253.241.10-10.253.241.100 mask 255.255.255.0

3. I want to use split tunnel for my VPN users, so I will create an ACL for my internal LAN. Applying this will make any subnet in the ACL get pushed to the clients routing table. This means that only the needed subnets come across the VPN.

access-list Split-Tunnel standard permit 10.1.10.0 255.255.255.0

Speaking of the Split tunnel ACL, you could do a group in the ACL and if you add a lot of networks in your organization you could just drop the new network in the group and everything would get updated dynamically.

Next lets configure the Webvpn options. WebVPN? Whats that, weren’t we configuring Anyconnect? Well true, Anyconnect and WebVPN are completley different. Webvpn is the https://portal that you logged into. By logging into this page you can give the client links/bookmarks to internal resource, and give them a platform to download the Anyconnect client. Anyconnect is the actual VPN client that connects the user to internal resources. So lets get our Webvpn enabled and select the image we want to use. In this case its the newest windows image. Also note – I have the login page show the tunnel groups that are enabled. If I had multiple groups – lets say one for Traveling salesman and one for Internal Employees, each might have different bookmarks/links , different IP subnets, and different resources they are allowed to get to.

webvpn
 enable inside
 enable outside
 anyconnect image disk0:/anyconnect-win-3.1.05178-k9.pkg 1
 anyconnect enable
 tunnel-group-list enable

4. Now lets create the Group policy to use for our Anyconnect session. A Group Policy is “is a set of user-oriented attribute/value pairs for IPSec/SSL connections that are stored either internally (locally) on the device or externally on a RADIUS or LDAP server. A tunnel group uses a group policy that sets terms for user connections after the tunnel is established. ” – From Cisco. The Group policy allows use to specify a lot of settings that any tunnel using the GP will get. For example DNS servers, and the Split-Tunnel policy.
group-policy Anyconnect internal
group-policy Anyconnect attributes
 dns-server value 10.1.10.5 8.8.8.8
 vpn-tunnel-protocol ssl-client ssl-clientless
 split-tunnel-policy tunnelspecified
 split-tunnel-network-list value Split-Tunnel

5. Next we will configure the Tunnel-group for this network. Tunnel groups contain a small number of attributes that pertain to creating the tunnel itself. Tunnel groups include a pointer to a group policy that defines user-oriented attributes. Some of these attributes are the DHCP Pool, what kind of encryption , etc.

tunnel-group Anyconnect type remote-access
tunnel-group Anyconnect general-attributes
 address-pool Anyconnect-VPN-Pool
 default-group-policy Anyconnect

tunnel-group Anyconnect webvpn-attributes
 group-alias Anyconnect enable

6. In this case I am using local authentication – Not using LDAP or Radius. So i will create the user and assign the user to the correct Group Policy

username <value> password <value>
username <value> attributes
 vpn-group-policy Anyconnect
 service-type remote-access

7. One of the most important things to do is make sure our “No-Nat” is there.

nat (inside,outside) source static Internal-Lan Internal-Lan destination static Anyconnect-Subnet Anyconnect-Subnet
nat (inside,outside) source static Anyconnect-Subnet Anyconnect-Subnet destination static Internal-Lan Internal-Lan

Thats it. Everything works great. Below is the template only

ip local pool Anyconnect-VPN-Pool 10.253.241.10-10.253.241.100 mask 255.255.255.0

object network Anyconnect-Subnet
 subnet 10.253.241.0 255.255.255.0
object network Internal-Lan
 subnet 10.1.10.0 255.255.255.0

access-list Split-Tunnel standard permit 10.1.10.0 255.255.255.0

webvpn
 enable inside
 enable outside
 anyconnect image disk0:/anyconnect-win-3.1.05178-k9.pkg 1
 anyconnect enable
 tunnel-group-list enable

group-policy Anyconnect internal
group-policy Anyconnect attributes
 dns-server value 10.1.10.5 8.8.8.8
 vpn-tunnel-protocol ssl-client ssl-clientless
 split-tunnel-policy tunnelspecified
 split-tunnel-network-list value Split-Tunnel

tunnel-group Anyconnect type remote-access
tunnel-group Anyconnect general-attributes
 address-pool Anyconnect-VPN-Pool
 default-group-policy Anyconnect
tunnel-group Anyconnect webvpn-attributes
 group-alias Anyconnect enable
!
username <value> password <value>
username <value> attributes
 vpn-group-policy Anyconnect
 service-type remote-access

nat (inside,outside) source static Internal-Lan Internal-Lan destination static Anyconnect-Subnet Anyconnect-Subnet
nat (inside,outside) source static Anyconnect-Subnet Anyconnect-Subnet destination static Internal-Lan Internal-Lan
!
Fortigate – Restart SSL VPN Process

*Note – Just did this on a 300D running 5.6.2 code. CPU was running at 100% and the SSL VPN process was the culprit. The connection status would stall at 40%, then quit at 75%. Killing the process with the notes below worked great. Also, I am pretty sure that their is a reference in release notes of 5.6.2 about CPU going crazy due to a bug.

If the Mem goes to high, and the device drops to conserv mode. The SSL VPN may stop working correctly, or at all.

A quick reboot of the firewall will fix this issue, but restarting the VPN process will also fix it (given the mem dropped). You can also restart any process with these commands.

To restart the process:

get system performance top – to get the process ID (PID) of the SSL VPN

get-pid

Looks like the PID of sslvpnd – 81

Next, we will kill the process with the kill command and use the level 11 – which restarts the process.

the command: dia sys kill <level> <PID>

dia sys kill 11 81

If you do the get sys per top command again, you will notice that the sslvpnd process now has a different PID.

Copy Files to Cisco ASA with SCP

Recently I had to upload a new Anyconnect image to a ASA. I was running out of options. I used SCP for the first time, a little slow but worked great.

First enable SCP to be used:

config t

ssh scopy enable

Then use a SCP client like Putty’s PSCP.exe to copy the file over. The command I used was:

pscp.exe image username@ip-of-ASA:Image-on-ASA-Name

pscp.exe anyconnect-win-3.1.05178-k9.pkg admin@1.1.1.1:anyconnect-win-3.1.05178-k9.pkg

I kept getting the error: Fatal: Received unexpected end-of-file from server

I googled for this a long time, and nothing. So a good answer: This meant that the flash was full, and there was not enough room to save the file. I removed the old images, and copied this one just fine.


Fortigate and Ruckus AP remote registration issues across a IPSEC VPN

Recently I and others have had an issue when using interface based VPNs on Fortigate, and remote Ruckus APs are on the other side of the VPN. For some reason these APs cannot register with the ZD – sometimes they never even show up. I can log into the remote APs, SSH, Web, Ping everything works they will just not register with the ZD.

When I see this the most the client has just updated to Fortinet 5.2 firmware, and is using Interface based VPNs instead of policy based.

Now back to the main goal of the entry – If you are using a interface based VPN with Fortinet specifically you might see your APs come up for a while, then drop. Another symptom I have seen is that you have your DHCP options, and DNS record  set for the Zonedirector but the APs never show up.  The underlying issue is that the interface based VPN will drop sometimes – the Fortigate may not even report the drop. During this time the the Logical VPN interface is no longer attached to the Fortigate, that means the route you set to push traffic over it to the remote subnet no longer exists. So a UDP session is opened to the internet – since there is no other place to send the traffic to. Once that happens the UDP stays active – Even though it should timeout.

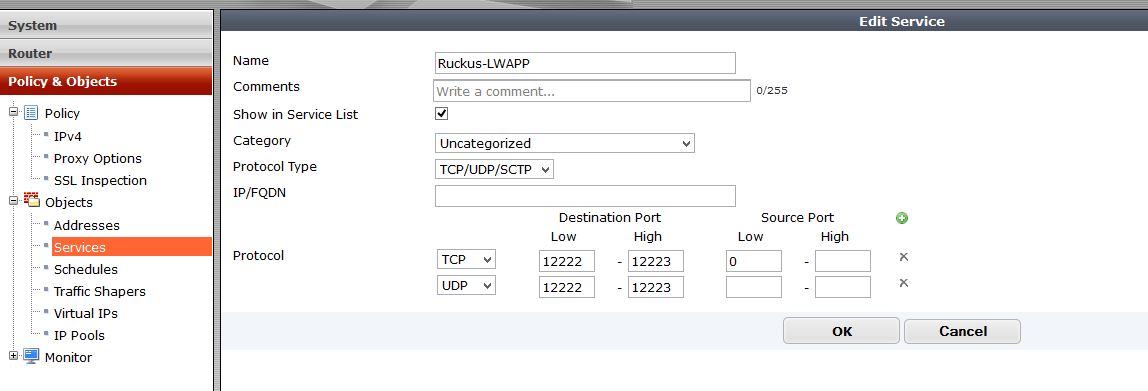
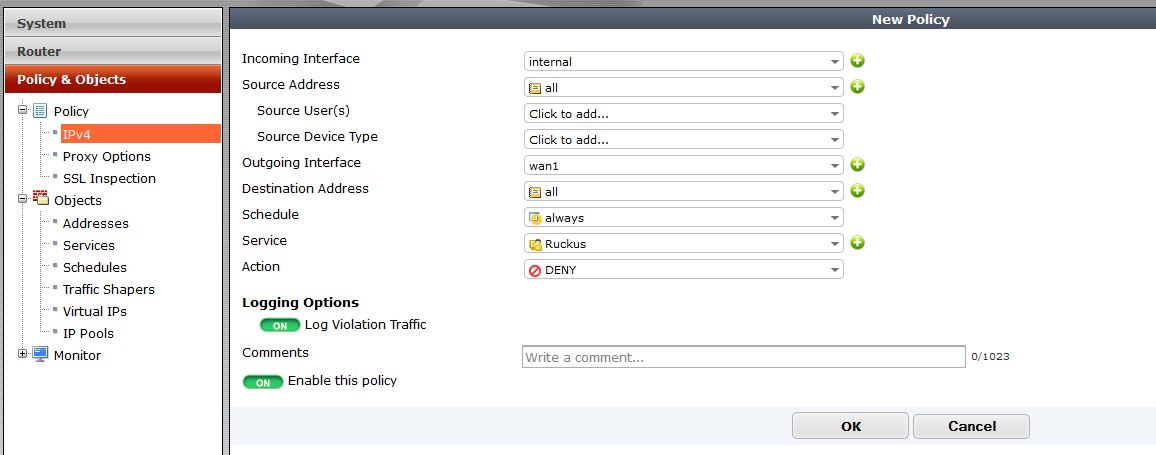
So to fix the issue, Add a service for “Ruckus services” and add UDP and TCP ports 12223, and UDP and TCP port 12222. Then create a policy in the firewall to block traffic going to the WAN on those ports. This will make sure that remote sessions are never created to the internet interface. So if the tunnel drops you will not have to worry about this. You could also just create an address object for your remote subnet and create a policy blocking any traffic matching that object going to the WAN interface.

ruckus-service

Here is the policy to block the traffic from leaving the WAN interface

Ruckus-block

Note – Make sure this policy is above any traffic that would be go from internal – to VPN.

After the policy is created to blog those ports – lets clear the sessions in the firewall. We can do this using the CLI command in the Fortigate:

Dia system session clear

So how did we figure this out? If you do a packet capture on the Fortigate matching the ZD or AP ip addresses, you will see registration attempts trying to go through the WAN interface, even though the VPN is up. Since UDP is connectionless, it never expects a response on the session, so it stays up. If you see the session going through your WAN interface, and your VPN is up, just kill that session. You will see your AP come up very quickly, but the same issue will happen if you don’t make sure the session is never created.

This has fixed the issue for a few clients having this problem.

Fortigate SSL VPN configuration on 5.2

First off the best documentation can be found at docs.fortinet.com

Fortigate has changed a lot in 5.2, one of the things that has been changed heavily is how to setup the SSL VPN. Some of the ways it has changed:

– Portal creation

– Settings

– Firewall policies (for interfaces)

So to enable and create needed policies for the SSL VPN to function we will create a scope 10.99.255.0/24 for our VPN subnet, and make sure our two local networks are being sent to the clients routing table VIA Split tunneling – our local subnets 10.32.250.0/24 and 10.32.251.0/24.

First lets create the address object for our SSL VPN clients

ssl-5-2-address

Portal Config

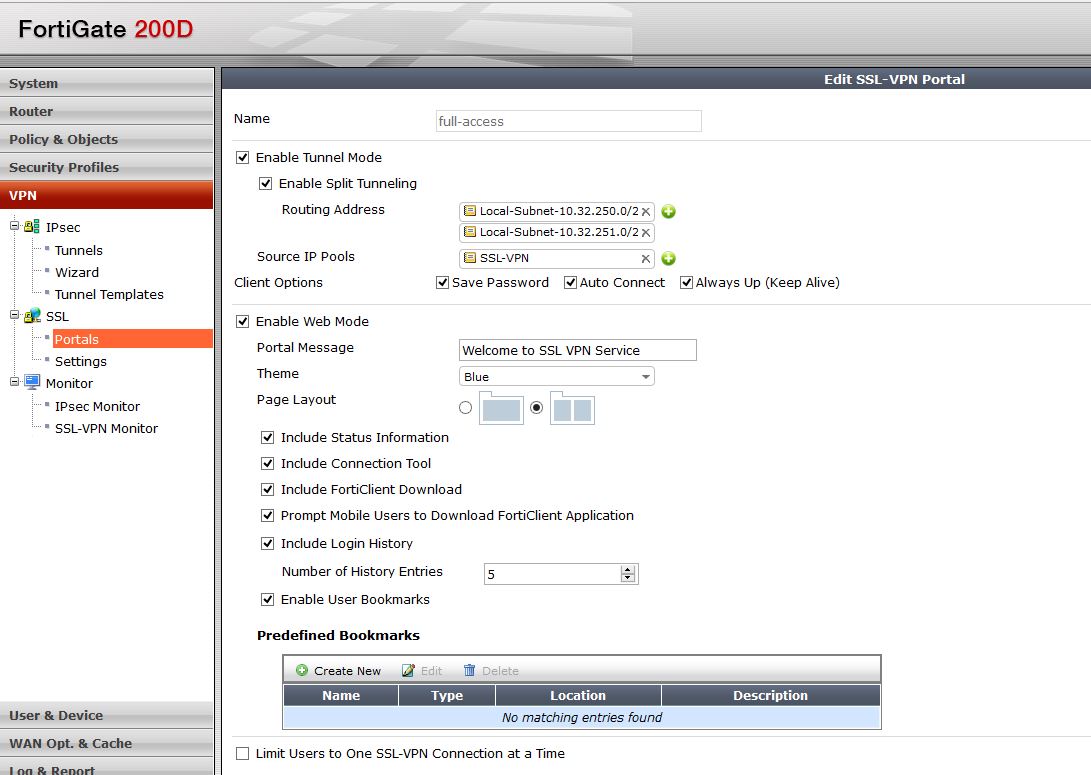
In the portal we can configure Split tunnel, IP Pools, bookmarks etc. 

You also have options to save the password and the allow more than one instance of that user to login.

SSL-5-2-portal

VPN Settings

Then we will start to configure settings for our VPN. Notice that it is much different than 5.0. We configure the port, VPN client addresses and who can access the VPN from here. Before it was in many different places. Also notice at the bottom there is the users who can log into this device, and what portal they will see. You can totally customize this so that domain admins get one portal and restricted users get another.

ssl-5-2-settings-2

You will see that after you configure what is needed, there is a red line that comes up and says “default users not configured” if you only have one profile then modify this. If you have multiple portals then add the most specific first, then make the standard catch all this profile.

Firewall Policies

Next we need to create firewall policies to allow traffic to and from our VPN. This is also a big change from 5.0 where you would need to create a default WAN-LAN policy and have the service be SSL, here that is really done in the vpn-settings page.

So lets allow VPN traffic to our LAN and make sure we are using the network address objects that are specified in the Split tunnel policy under the portal. Adding the local subnets basically allows VPN clients to have access to those networks. You could use Any here, I chose to use my local subnets.

SSL-5-2-Policy-1

Then create the opposite of that policy to allow traffic from the lan to access the SSL VPN interface.

SSL-5-2-policy-2

One more thing is needed – We need a route to that SSL VPN subnet.

SSL-5-2-Route

That should be pretty much it. There are some considerations that should always be taken into account. For one, always evaluate the security that you need. In this example I did not add any UTM or restrictions to who can access the VPN, and to what servers/addresses. Something else – Notice that in the VPN-Settings page, if you are doing Forticlient registration, you need to make sure that option is checked so registration can be used on that interface. One of the other things to think about is the amount of time users stay logged into the VPN.

After enabling that your VPN should work great!

Feel free to contact me if you have any problems

Fortinet Apple Caching

Apple Caching server is a very cool idea. I am not a big apple fan, so I don’t know exactly how it works. From what I have seen, you install the software on a server. Apple servers cache apps and files that many devices will ask for, therefore when one user downloads a file it caches it on the local servers. When another user coming from the same public IP address downloads that same file, it pulls it from the caching server thus eliminating the bandwidth need.

Apple has a run down of exactly what happens:

http://help.apple.com/serverapp/mac/3.0/help/#apdC36C9994-1533-4DCB-9CFF-870CB0FADCDB


But how do you make sure Apple caching is working correctly in your network. By default everything should flow out of your default nat policy – but what if you have a bunch of different nats?

you want to make sure that your caching server and clients are seen by apple as the same IP address.

I do this this through a internal to wan policy and make sure that anything going to 17.0.0.0/8 (apple owns this whole block) and anything going to .apple.com goes out of the same policy.

you can do this with a Address object, and firewall policy to go out via that policy.