Docs.fortinet.com is always the best place to get any Fortinet info.
Fortinet like most firewall vendors supports almost all Dynamic routing protocols. BGP is one, the GUI has simple to setup BGP options, but many do not exist in CLI, which might be for the best. In this post I will show how to create a Route-map and prepend the AS path influence ISP/neighbor routing.
First lets talk about why you would want to prepend an AS path. You would want to do this to influence how neighbors get to your routes. For example, if you had two ISPs, or neighbors and wanted to broadcast your routes to both neighbors, but wanted everyone to take neighbor 1 to get to your router, with a backup of Neighbor 2 you could prepend the AS path and make this happen.
BGP is a very deep protocol and there are many different ways to influence routing. Routers will always take the shortest AS path to get to its destination so that is the preferred method for this.
Steps:
– Add BGP neighbors/networks – you can do this in GUI
– In CLI create route-map and use the commands to prepend YOUR AS path
– Assign Route-map to neighbor
– Clear BGP routes.
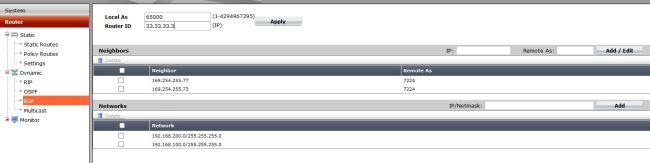
Create BGP in GUI.
This includes our AS number, the Neighbors and their AS numbers, and our networks we are advertising.
Route-map Creation
Lets then drop to CLI and create our Route-map
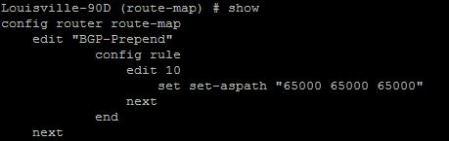
Commands:
config router route-map
config “Name” —- create route map
edit rule X — from there you can set your Prepend
set set-aspath “x x x “
set action permit — I did not add this in the image. Routes will be blocked if this is not added.
end
Assigning Route-map
Now lets assign the route map to our neighbor. Since we are wanting to control how routing will get to us, we will apply this route map to outgoing routes.
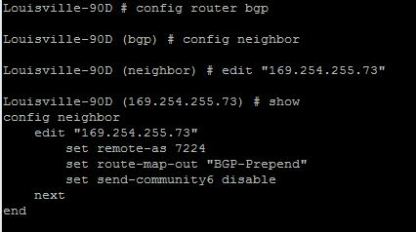
the command “set route-map-out” is what sets the route map on the outbound routes.
Last but not least, lets clear the IP routes so our prepend takes effect. You can do this through the command:
exe router clear bgp ip x.x.x.x out
This will clear all routes from this neighbor. If this is a live production network, it would be better to run the command:
exe router clear bgp ip x.x.x.x soft out
A soft reset uses stored prefix information to reconfigure and activate BGP routing tables without tearing down existing peering sessions. Soft reconfiguration uses stored update information, at the cost of additional memory for storing the updates, to allow you to apply new BGP policy without disrupting the network. Soft reconfiguration can be configured for inbound or outbound sessions.
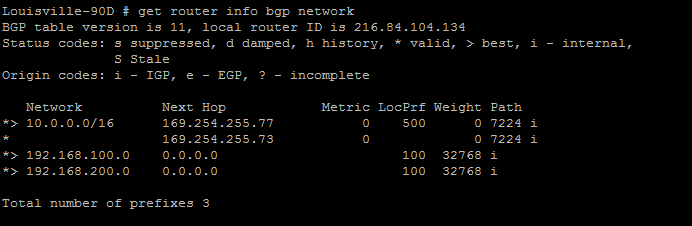
Status
So now we need to take a look at the routes we are sending out to see if our AS has actually be altered. After resetting the peer it might take a minute or two before this shows up correctly.
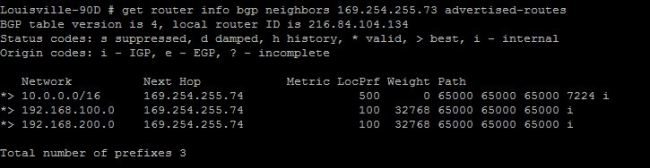
The command is:
get router info bgp neighbors x.x.x.x advertised-routes
That’s it!
Now we are controlling how devices will get to our networks in a Dual homed situation (two connections to ISPs). The querying devices will always take the lower AS path to get to its destination.